
BoBo

Monday, 7 April 2014
All Miromax FIrmware
Micromax_A25:DOWNLOAD
Micromax_A26:DOWNLOAD
Micromax_A27:DOWNLOAD
Micromax_A30:DOWNLOAD
Micromax_A34:DOWNLOAD
Micromax_A35:DOWNLOAD
Micromax_A36:DOWNLOAD
Micromax_A40:DOWNLOAD
Micromax_A44:DOWNLOAD
Micromax_A45:DOWNLOAD
Micromax_A47:DOWNLOAD
Micromax_A50:DOWNLOAD
Micromax_A51:DOWNLOAD
Micromax_A52:DOWNLOAD
Micromax_A54:DOWNLOAD
Micromax_A55:DOWNLOAD
Micromax_A56:DOWNLOAD
Micromax_A57:DOWNLOAD
Micromax_A58:DOWNLOAD
Micromax_A60:DOWNLOAD
Micromax_A61:DOWNLOAD
Micromax_A62:DOWNLOAD
Micromax_A63:DOWNLOAD
Micromax_A65:DOWNLOAD
Micromax_A67:DOWNLOAD
Micromax_A68:DOWNLOAD
Micromax_A70:DOWNLOAD
Micromax_A72:DOWNLOAD
Micromax_A73:DOWNLOAD
Micromax_A74:DOWNLOAD
Micromax_A75:DOWNLOAD
Micromax_A76:DOWNLOAD
Micromax_A77:DOWNLOAD
Micromax_A78:DOWNLOAD
Micromax_A80:DOWNLOAD
Micromax_A84:DOWNLOAD
Micromax_A85:DOWNLOAD
Micromax_A86:DOWNLOAD
Micromax_A87:DOWNLOAD
Micromax_A88:DOWNLOAD
Micromax_A89:DOWNLOAD
Micromax_A90:DOWNLOAD
Micromax_A90s:DOWNLOAD
Micromax_A92:DOWNLOAD
Micromax_A95:DOWNLOAD
Micromax_A100:DOWNLOAD
Micromax_A110:DOWNLOAD
Micromax_A110Q:DOWNLOAD
Micromax_A111:DOWNLOAD
Micromax_A113:DOWNLOAD
Micromax_A114:DOWNLOAD
Micromax_A115:DOWNLOAD
Micromax_A116:DOWNLOAD
Micromax_A116i:DOWNLOAD
Micromax_A117:DOWNLOAD
Micromax_A200:DOWNLOAD
Micromax_A210:DOWNLOAD
Micromax_A240:DOWNLOAD
Micromax_A250:DOWNLOAD
Android All In One Tool Kit
https://sourceforge.net/projects/androidallinonetoolkit/files/latest/download
https://sourceforge.net/projects/androidallinonetoolkit/
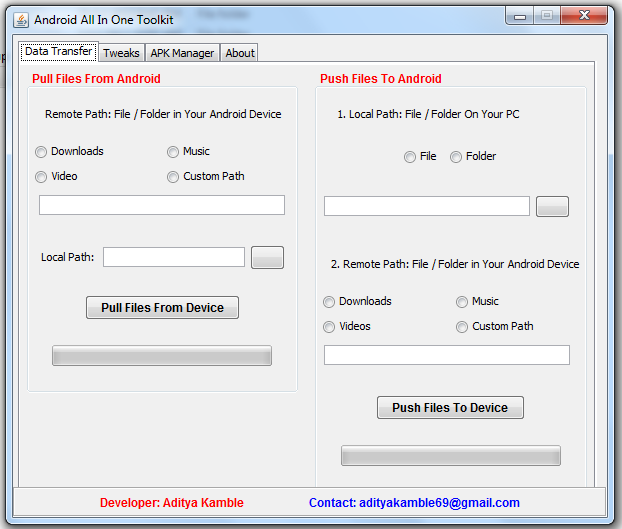
I Made This tool for making workflow more easier for stuff like transfering data from pc to phone and phone to pc . Rather than connecting mass storage via USB you can transfer data using this tool via adb. No need of any command just use this tool for stuff like
Features:
1. Fast Data Transfer Using adb ( Instead Of SD Card Mounting )
2. Tweaks for Android
3. Build Prop Editor
4. Android APK Manager
Requirements:
1. Android Device Connected To PC in Debugging Mode Enabled
2. USB Drivers Should Be Installed
User Manual :
1. Fast Data Transfer Using adb ( Instead Of SD Card Mounting ):
We used to transfer our data in mobile phone by connecting SD Card to pc but As per my experience it takes much time to connect for bulky SD Cards . So By using this feature You can pull data from device or push data from device
Pulling Data From Phone :
Just select the folder of SD card from which you want to pull data Viz. download , music ,videos I Made ready made option for that You can even set custom folder by giving path in that field like : /sdcard/Documents/
Pushing Data To phone:
In case you want to transfer a file to phone Browse that file and select the destination folder of your SD Card viz. download , music ,video or even custom path
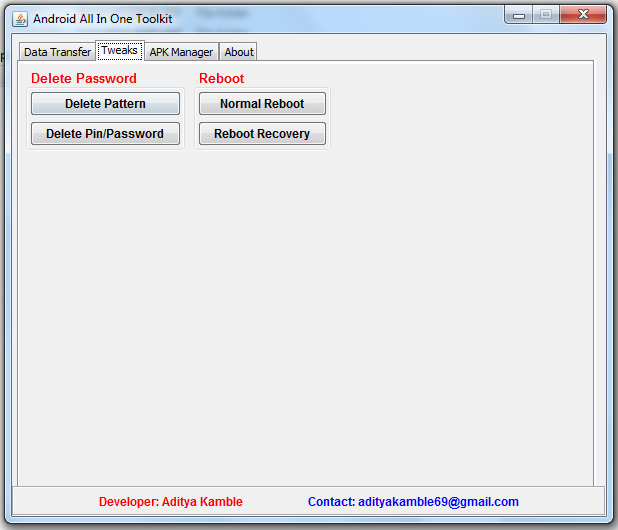
2. Tweaks :
Most android users love android tweaks I made some tweaks for android like Unlock Pattern And Unlock Pin/Password On A Single Click ( *ROOT REQUIRED* ) . More Tweaks will be adding soon as per suggestions and requests
3. Build Prop Editor :
You can modify build properties directly using this application . ( * ROOT REQUIRED* ). This is risky part So Carefully modify build properties.
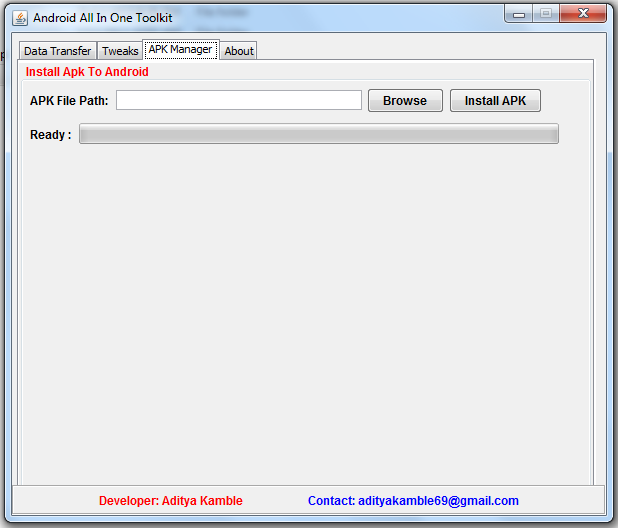
4. APK Manager:
Many people takes backup of their android apk apps. So when you havebackup and want to install to phone directly , use this feature. Browse the apk file and click on install Apk wait for progress bar to complete installation . & Yap.. App is installed.
Screenshots :
1. Data Transfer
2. Tweaks
3. APK Manager
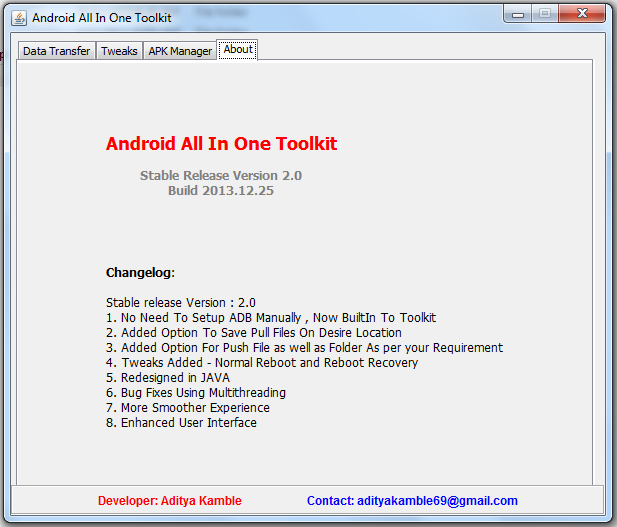
5. About App
https://sourceforge.net/projects/androidallinonetoolkit/
I Made This tool for making workflow more easier for stuff like transfering data from pc to phone and phone to pc . Rather than connecting mass storage via USB you can transfer data using this tool via adb. No need of any command just use this tool for stuff like
Features:
1. Fast Data Transfer Using adb ( Instead Of SD Card Mounting )
2. Tweaks for Android
3. Build Prop Editor
4. Android APK Manager
Requirements:
1. Android Device Connected To PC in Debugging Mode Enabled
2. USB Drivers Should Be Installed
User Manual :
1. Fast Data Transfer Using adb ( Instead Of SD Card Mounting ):
We used to transfer our data in mobile phone by connecting SD Card to pc but As per my experience it takes much time to connect for bulky SD Cards . So By using this feature You can pull data from device or push data from device
Pulling Data From Phone :
Just select the folder of SD card from which you want to pull data Viz. download , music ,videos I Made ready made option for that You can even set custom folder by giving path in that field like : /sdcard/Documents/
Pushing Data To phone:
In case you want to transfer a file to phone Browse that file and select the destination folder of your SD Card viz. download , music ,video or even custom path
2. Tweaks :
Most android users love android tweaks I made some tweaks for android like Unlock Pattern And Unlock Pin/Password On A Single Click ( *ROOT REQUIRED* ) . More Tweaks will be adding soon as per suggestions and requests
3. Build Prop Editor :
You can modify build properties directly using this application . ( * ROOT REQUIRED* ). This is risky part So Carefully modify build properties.
4. APK Manager:
Many people takes backup of their android apk apps. So when you havebackup and want to install to phone directly , use this feature. Browse the apk file and click on install Apk wait for progress bar to complete installation . & Yap.. App is installed.
Screenshots :
1. Data Transfer
2. Tweaks
3. APK Manager
5. About App

Sunday, 6 April 2014
SigmaKey Software v1.35.06 released
New models have been added. Improved work with the already supported phone models.
Work with the service software have been greatly simplified.
http://sigmakey.com/en/Downloads/Software.html
Work with the service software have been greatly simplified.
http://sigmakey.com/en/Downloads/Software.html

Saturday, 5 April 2014
htc desire c a320e hard reset
The most convenient way to do a factory reset is via the phone settings.
Press HOME > MENU, then tap Settings.
Scroll down the screen, and then tap Privacy > Factory data reset.
On the Factory data reset screen, tap Reset phone, and then tap Erase everything.
Warning! Always turn off your device before installing/replacing the battery and SIM card.
HTC A7272 HTC Vision factory reset
Remove the battery, wait for a few seconds, then reinsert the battery.
Press and hold the VOLUME DOWN button, and then press and hold the POWER button.
Wait for the screen with the three Android images to appear, and theWith the phone turned off, press and hold the VOLUME DOWN button, and then briefly press the POWER button.
Wait for the screen with the 3 Android images to appear, and then release the VOLUME DOWN button.
Press VOLUME DOWN to select CLEAR STORAGE, and then press POWER.
When asked to confirm, press VOLUME UP.
HTC Desire Z hard reset Vision reset A7272 reset keys
Performing a factory reset via settings
Performing a factory reset via settings
The most convenient way to do a factory reset is via the phone settings.
1. From the Home screen, press MENU, and then tap Settings.
2. Tap SD & phone storage > Factory data reset.
3. Tap Reset phone, and then tap Erase everything.
Warning! Always turn off your device before installing/replacing the battery and SIM card.
Bootloader
HTC Desire Z hard reset Vision reset A7272 reset keysn release the POWER and VOLUME DOWN buttons.
Press VOLUME DOWN to select FACTORY RESET, and then press the POWER button.
HTC DESIRE 500 (HARD RESET)
Remove the battery, wait for a few seconds, then reinsert the battery.
Press and hold the VOLUME DOWN button, and then press and hold the POWER button.
Wait for the screen with the three Android images to appear, and then release the POWER and VOLUME DOWN buttons.
Press VOLUME DOWN to select FACTORY RESET, and then press the POWER button.
How to Update iPhone 3GS / 3G Baseband to 06.15.00 with Redsn0w 0.9.6b5 for iOS 4.2.1 Unlock
Redsn0w 0.9.6b5 has just been released which can jailbreak and update iPhone 3GS & 3G baseband to 06.15.00 so that it can be unlocked using the newly released Ultrasn0w 1.2.
The new redsn0w 0.9.6beta5 is out. It gives both Windows and OSX users the ability to flash the iPad 06.15 baseband on iPhone3G or iPhone3GS. It fetches the baseband files directly from Apple for now (the only IPSW you ever point it at is the stock IPSW for the FW on your iPhone right now). There may be a long delay while it’s doing this (their servers are getting pounded right now)
If you do flash your baseband via redsn0w, please keep it plugged into USB the whole time. You don’t want your battery to die during the flash process!
WARNING:
YOU DO THIS AT YOUR OWN RISK! PLEASE UNDERSTAND THE CONSEQUENCES OF UPDATING TO 06.15.
There is no way to come back down from 06.15, and there’s no hiding the baseband version from Apple. You’ll be voiding your warranty in a very obvious way.
If some future baseband comes out with a critical fix, you won’t be able to update to it if it remains down in the 05.xx sequence (then again, you wouldn’t update to it if you wanted to keep your unlock anyway).
Starting with FW 4.2.1 if you have 06.15 on your iPhone you won’t ever be able to restore to stock firmware (it will fail). You’ll need to only restore to custom IPSWs (then again, if you’re unlocker you should already be doing that).
Also, like the previous version of Redsn0w:
This version of Redsn0w is based on Geohot’s Limera1n bootrom exploit which has already pwned all current iOS devices for life. The only problem is that it is a tethered jailbreak, which means you will have to boot it into a “jailbroken state” on every reboot. This so called tethered or semi-tethered jailbreak condition in Redsn0w 0.9.6b4 & b5 however only applies to the new devices like: iPhone 3GS (new bootrom), iPhone 4, iPad, iPod touch 2G (MC Model), iPod touch 3G and the iPod touch 4G. Old devices like iPhone 3GS (old bootrom), iPhone 3G and iPod touch 2G (Non-MC Model) can be jailbroken-untethered right now using this latest version of Redsn0w. So until and unless Comex of Spirit and JailbreakMe fame comes up with another untethered hack for iOS 4.2.1, the jailbreak we get for the newer devices will be tethered (or semi-tethered).
Note: This release of Redsn0w is mainly targeted for iPhone 3GS & 3G users on iOS 4.1 / 4.2.1 who rely on a carrier unlock. All iPhone 4, 3GS, iPad and iPod touch users who don’t rely on a carrier unlock should follow the instructions posted here to jailbreak their iOS device on iOS 4.2.1 using Redsn0w 0.9.6b4.
Follow the instructions posted below to update your iPhone 3GS or 3G to 06.15.00 baseband and jailbreak it on iOS 4.1 /4.2.1.
Step 1: Download iOS 4.2.1 for iPhone 3GS or 3G.
Step 2: Update/Restore to iOS 4.2.1 firmware using the IPSW file you just downloaded via iTunes 10.1.
Step 3: Start Redsn0w 0.9.6b5 and point it to iOS 4.2.1 firmware to proceed with the jailbreak.


Step 4: Now select “Install Cydia” & “Install iPad baseband” options and then click “Next” to continue. Redsn0w will now fetch the exploitable 06.15.00 baseband from 3.2.2 firmware and will replace it the baseband in iOS 4.2.1 / 4.1.

Note: Install iPad baseband option is applicable to iPhone 3GS & 3G users only who rely on a carrier unlock.
Step 5: Now make sure your device is both OFF and PLUGGED IN to the computer before you click “Next”.
At this stage you will be presented with a screen where you will have to quickly hold “Power” button and then while holding the “Power” button, you will now have to hold “Home” button too. Now after few seconds release “Power” button but keep holding “Home” button until installation begins.

Step 6: Sit back and enjoy while Redsn0w will do all the rest for you. Once done, your iPhone or iPod touch will restart automatically and you will find it jailbroken on the latest iOS 4.2.1 firmware, with the unlockable 06.15.00 baseband.
For iPhone 4, 3GS (New Bootrom), iPod touch 4G / 3G / 2G, iPad ONLY:
Step 7: Now from here onwards, whenever you want to do anything related to jailbreak like SSHing into your device, or running Cydia, you must first run your device in the so called “jailbroken state” on every reboot by using “Just boot tethered right now” option in Redsn0w.

How to Unlock iPhone 3GS & 3G on iOS 4.2.1 / 4.1
Follow the complete step by step guide posted here to unlock your iPhone 3GS and 3G on 06.15.00 baseband, running iOS 4.2.1 or 4.1 with Ultrasn0w 1.2.
UPDATE: Video instructions for the above tutorial is embedded below:
The new redsn0w 0.9.6beta5 is out. It gives both Windows and OSX users the ability to flash the iPad 06.15 baseband on iPhone3G or iPhone3GS. It fetches the baseband files directly from Apple for now (the only IPSW you ever point it at is the stock IPSW for the FW on your iPhone right now). There may be a long delay while it’s doing this (their servers are getting pounded right now)
If you do flash your baseband via redsn0w, please keep it plugged into USB the whole time. You don’t want your battery to die during the flash process!
WARNING:
YOU DO THIS AT YOUR OWN RISK! PLEASE UNDERSTAND THE CONSEQUENCES OF UPDATING TO 06.15.
There is no way to come back down from 06.15, and there’s no hiding the baseband version from Apple. You’ll be voiding your warranty in a very obvious way.
If some future baseband comes out with a critical fix, you won’t be able to update to it if it remains down in the 05.xx sequence (then again, you wouldn’t update to it if you wanted to keep your unlock anyway).
Starting with FW 4.2.1 if you have 06.15 on your iPhone you won’t ever be able to restore to stock firmware (it will fail). You’ll need to only restore to custom IPSWs (then again, if you’re unlocker you should already be doing that).
Also, like the previous version of Redsn0w:
This version of Redsn0w is based on Geohot’s Limera1n bootrom exploit which has already pwned all current iOS devices for life. The only problem is that it is a tethered jailbreak, which means you will have to boot it into a “jailbroken state” on every reboot. This so called tethered or semi-tethered jailbreak condition in Redsn0w 0.9.6b4 & b5 however only applies to the new devices like: iPhone 3GS (new bootrom), iPhone 4, iPad, iPod touch 2G (MC Model), iPod touch 3G and the iPod touch 4G. Old devices like iPhone 3GS (old bootrom), iPhone 3G and iPod touch 2G (Non-MC Model) can be jailbroken-untethered right now using this latest version of Redsn0w. So until and unless Comex of Spirit and JailbreakMe fame comes up with another untethered hack for iOS 4.2.1, the jailbreak we get for the newer devices will be tethered (or semi-tethered).
Note: This release of Redsn0w is mainly targeted for iPhone 3GS & 3G users on iOS 4.1 / 4.2.1 who rely on a carrier unlock. All iPhone 4, 3GS, iPad and iPod touch users who don’t rely on a carrier unlock should follow the instructions posted here to jailbreak their iOS device on iOS 4.2.1 using Redsn0w 0.9.6b4.
Follow the instructions posted below to update your iPhone 3GS or 3G to 06.15.00 baseband and jailbreak it on iOS 4.1 /4.2.1.
Step 1: Download iOS 4.2.1 for iPhone 3GS or 3G.
Step 2: Update/Restore to iOS 4.2.1 firmware using the IPSW file you just downloaded via iTunes 10.1.
Step 3: Start Redsn0w 0.9.6b5 and point it to iOS 4.2.1 firmware to proceed with the jailbreak.
Step 4: Now select “Install Cydia” & “Install iPad baseband” options and then click “Next” to continue. Redsn0w will now fetch the exploitable 06.15.00 baseband from 3.2.2 firmware and will replace it the baseband in iOS 4.2.1 / 4.1.
Note: Install iPad baseband option is applicable to iPhone 3GS & 3G users only who rely on a carrier unlock.
Step 5: Now make sure your device is both OFF and PLUGGED IN to the computer before you click “Next”.
At this stage you will be presented with a screen where you will have to quickly hold “Power” button and then while holding the “Power” button, you will now have to hold “Home” button too. Now after few seconds release “Power” button but keep holding “Home” button until installation begins.
Step 6: Sit back and enjoy while Redsn0w will do all the rest for you. Once done, your iPhone or iPod touch will restart automatically and you will find it jailbroken on the latest iOS 4.2.1 firmware, with the unlockable 06.15.00 baseband.
For iPhone 4, 3GS (New Bootrom), iPod touch 4G / 3G / 2G, iPad ONLY:
Step 7: Now from here onwards, whenever you want to do anything related to jailbreak like SSHing into your device, or running Cydia, you must first run your device in the so called “jailbroken state” on every reboot by using “Just boot tethered right now” option in Redsn0w.
How to Unlock iPhone 3GS & 3G on iOS 4.2.1 / 4.1
Follow the complete step by step guide posted here to unlock your iPhone 3GS and 3G on 06.15.00 baseband, running iOS 4.2.1 or 4.1 with Ultrasn0w 1.2.
UPDATE: Video instructions for the above tutorial is embedded below:
Blackberry MEP Reader, Code Calculator
Can be use in calculating or generating codes like cyclone box . This is an alternative way to
calculate codes from cyclone..coz' connecting USB in cyclone sometimes takes hard.

Download MEP READER HERE!
calculate codes from cyclone..coz' connecting USB in cyclone sometimes takes hard.
Download MEP READER HERE!
HTC ThunderBolt 4G Hard Reset or Format to Factory Settings
Just make sure to save all data and personalized application and settings installed before commencing the factory setting. Performing a hard reset is only advisable if the HTC ThunderBolt 4G experiencing application problem like freezing or hang etc. This process will restore the device to its original factory default state settings.

HTC ThunderBolt 4G Soft Reset:
1). Turn off HTC ThunderBolt 4G
2). Take out the battery for a few seconds
3). Put back the battery, and turn the device on
4). Press and Hold ‘Volume’ button
5). Tap Restart
HTC ThunderBolt 4G Hard Reset Factory Setting through menu settings
1). Go to Home
2). Select Menu
3). Opt Settings
4). Select SD & Phone Storage, then tap Factory Data Reset
5). Tap Reset Phone
6). Select Erase Everything
Note: selecting YES will erase all data including apps and games installed; if you choose YES then the erasing process will start. After erasing process finish, the phone will automatically reboot and turn back on with default factory setting.
To Hard Reset to Factory Setting this can be done by button combination:
1). Turn off the HTC ThunderBolt 4G , press and hold ‘Volume Down’
2). Then briefly press the ‘Power’ button
3). Wait until the Android logo to shows up
4). Release the Volume Down button
5). Press the Volume Down to select Factory Reset
6). Press the ‘Power’ button
Once the wipe is complete the HTC ThunderBolt 4G will then reboot and it will restore back to its original factory settings.
Samsung Galaxy TAB GT-P1000 Hard Reset Procedure
Here's the instructions on how to hard reset the Samsung Galaxy TAB GT-P1000. Please do have a back-up copy all of the important documents stored on the device, it will be all deleted including any 3rd-party applications installed on it.
Samsung Galaxy TAB GT-P1000 Hard Reset
Resetting the device through Home Screen, this may hrlp to fix if the phone experience some hangs up or freezing if opening some applications.
Samsung Galaxy TAB GT-P1000 Hard Reset
To reset the phone:
1. Select Settings
2. Select Privacy
3. Select Factory Data Reset
4. Then select Reset Tablet
If the Samsung Galaxy TAB GT-P1000 is frozen or unresponsive, you can do hard reset through button key combination.
To hard reset:
1. Turn the Samsung Galaxy TAB GT-P1000 Power OFF
2. Press and Hold the Volume Down and Briefly press the Power button.
3.Release the Power button button when the Samasung logo appears.
4. An additional menu will appear, just follow the whole instruction to hard reset the device.

The device will then reboot, after this process been done and back to its original factory default settings.
Samsung Galaxy TAB GT-P1000 Hard Reset
Resetting the device through Home Screen, this may hrlp to fix if the phone experience some hangs up or freezing if opening some applications.
Samsung Galaxy TAB GT-P1000 Hard Reset
To reset the phone:
1. Select Settings
2. Select Privacy
3. Select Factory Data Reset
4. Then select Reset Tablet
If the Samsung Galaxy TAB GT-P1000 is frozen or unresponsive, you can do hard reset through button key combination.
To hard reset:
1. Turn the Samsung Galaxy TAB GT-P1000 Power OFF
2. Press and Hold the Volume Down and Briefly press the Power button.
3.Release the Power button button when the Samasung logo appears.
4. An additional menu will appear, just follow the whole instruction to hard reset the device.
The device will then reboot, after this process been done and back to its original factory default settings.
samsung I780 Security (Phone) Code Locked
If you have in hand a samsung i780 security (phone) code locked, but the problem is that you cannot hard reset from setting menu because you cannot enter its main menu at all, because of phone code blocking through it.

How to remove phone code on samsung I780? hard reset will not work.Here's the solution for that, All you need to do is to flash the phone to its original language ROM, but make sure that you recognize its original language ROM, but you can upload any ROM you want, it doesn't matter which rom or what version.
Bricking the device is possible (rare but possible) but it's the only chance you have to remove that code. You can easily find language ROM on the internet by searching.
Now here's the flashing guide for Samsung SGH-i780
PDF File:
http://rapidshare.com/files/22818959...hing_Guide.pdf
Files Needed:
1. Samsung USB Driver:
http://rapidshare.com/files/22819049..._WHQL_v3.4.exe
2. Russian ROMS:
http://www.4shared.com/file/63104055...HE1_Rev12.html
3. E1 English PDA ROM:
http://rapidshare.com/files/13151206...DXHE1.rar.html
4. Mirage Updater:
http://rapidshare.com/files/22819176...ge_LV_v1.8.exe
Tried and tested best result by flashing it using Windows XP OS
Samsung I9010 Galaxy S Giorgio Armani Hard Reset
Note: Please back up all of your personal data before you proceed. All data will be deleted on your Samsung I9010 Galaxy S Giorgio Armani by doing this procedure. However, this process will NOT delete data stored on the microSD memory card.

To Hard Reset Samsung I9010 Galaxy S Giorgio Armani
1.Turn the device off, or if the device is halting, remove the battery and put it back again.
2.Simultaneously, hold the volume down button and press the power button.
3.Menu will pop-out containing the option Fastbook, Recovery, Clear Storage, and Simlock.
4.In this case choose Clear Storage by pressing the Volume Down button.
5.Then press and release the power button.
6.Here you need to confirm your decision, to choose YES press Volume Up button or NO by pressing down button.
If the above procedures doesn't work, use this other android hard reset method below,
1. Shut Down Samsung I9010 Galaxy S Giorgio Armani
2. Now press the Volume up, Home and Power button simultaneously.
3. When a Samsung Symbol shows up release the power.
4. Then there is a boot Menu. Use the volume up/down to choose and home to select.
If YES is selected, all data including third-party applications will be deleted from your Samsung I9010 Galaxy S Giorgio Armani. Once the wipe is complete, the phone will reboot to its factory fresh state.
Samsung i8000 Omnia 2 hard reset
Resetting your Samsung i8000 Omnia2 Phone
Reset the i8000 Omnia II with keys works 100%
1. Turn OFF the phone
2. Press VolumeUp and Lock buttons + press Call and HangUp
3. Phone Vibrate and turn on
4. Release all buttons
Choose CALL to FORMAT.
or
Call + Power + Volume + Keylock + Reset
or
1. switch off your phone
2. Hold Volume up + Screen Lock
3. Then hold Call and Power Button
4. Press Call button to hard reset i8000
Samsung B7620 Armani hard reset
Samsung B7620 Giorgio Armani hard reset
Press and hold both W&L + LOCK key + CALL + POWER buttons together.
W&L button is on the top of GT-B7620 and Lock key is located on the rightside of Samsung B7620 phone
or
USE THIS METHOD FOR hard reset your Samsung B7620 Giorgio Armani phone:press *2767*3855#
or
MENU > Settings > Memory Settings
Clear Memory : delete all data and reset all settings to the manufacturer’s defaults.
Press and hold both W&L + LOCK key + CALL + POWER buttons together.
W&L button is on the top of GT-B7620 and Lock key is located on the rightside of Samsung B7620 phone
or
USE THIS METHOD FOR hard reset your Samsung B7620 Giorgio Armani phone:press *2767*3855#
or
MENU > Settings > Memory Settings
Clear Memory
: delete all data and reset all settings to the manufacturer’s defaults.
Flash Videos on Your iPhone, iPad, iPod touch “Without” Jailbreak
A new bookmarklet by the name of iOSFlashVideo has been released which allows iPhone, iPad and iPod touch users to watch Flash videos from sites such as Megavideo, Vimeo, Dailymotion, Flickr Video etc. right from the Safari browser (via native iOS media player).
Best of all, it doesn’t require you to jailbreak your iOS device! All you ever need to do is to add a bookmark to your browser, and you are done !
Follow the instructions below to set-up iOSFlashVideo on your iOS device.
Step 1: Start Safari and navigate to http://iosflashvideo.fw.hu/
Step 2: Now add this page as a bookmark by first tapping the “+” button, followed by “Add Bookmark” and then hit “Save” to save this page as a bookmark.

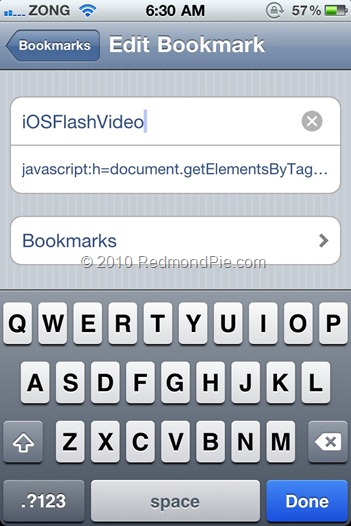
Step 3: Now go back to Safari Bookmarks and tap the “Edit” button, select “iOSFlashVideo” to edit it.
Step 4: Remove everything before “JavaScript” and tap “Done”, as shown in the screenshot below.
Step 5: Now navigate to any page which has Flash video content. You will notice that except for YouTube, all other flash videos will have blank white space as shown in the screenshot below.

Step 6: Now hit bookmarks, and select “iOSFlashVideo”. You will now notice that the unsupported Flash video has been loaded successfully as can also be seen in the screenshot below.

That’s it ! Whenever you come across a page with unsupported Flash video content, simply select “iOSFlashVideo” from the bookmarks for it to load properly.

Make sure you check out our iPhone Apps Gallery and iPad Apps Gallery to explore more apps for your iPhone and iPad.
Best of all, it doesn’t require you to jailbreak your iOS device! All you ever need to do is to add a bookmark to your browser, and you are done !
Follow the instructions below to set-up iOSFlashVideo on your iOS device.
Step 1: Start Safari and navigate to http://iosflashvideo.fw.hu/
Step 2: Now add this page as a bookmark by first tapping the “+” button, followed by “Add Bookmark” and then hit “Save” to save this page as a bookmark.
Step 3: Now go back to Safari Bookmarks and tap the “Edit” button, select “iOSFlashVideo” to edit it.
Step 4: Remove everything before “JavaScript” and tap “Done”, as shown in the screenshot below.
Step 5: Now navigate to any page which has Flash video content. You will notice that except for YouTube, all other flash videos will have blank white space as shown in the screenshot below.
Step 6: Now hit bookmarks, and select “iOSFlashVideo”. You will now notice that the unsupported Flash video has been loaded successfully as can also be seen in the screenshot below.
That’s it ! Whenever you come across a page with unsupported Flash video content, simply select “iOSFlashVideo” from the bookmarks for it to load properly.
Make sure you check out our iPhone Apps Gallery and iPad Apps Gallery to explore more apps for your iPhone and iPad.
Setool ,All USB Drivers ,For CSCA
Setool All USB Drivers For CSCA
drivers for CSCA(ALTBYPASS)_ONEPORT_WINXP_ONLY
For these files you need a do a special set-up
Before you use these files READ Setup in package.
The package is complete with all instructions and Register.exe
d750_usb_signed_drivers.rar
k310_usb_signed_drivers.rar
k320_usb_signed_drivers.rar
k510_usb_signed_drivers.rar
k530_usb_signed_drivers.rar
k550im_usb_signed_drivers.rar
k550_usb_signed_drivers.rar
k610im_usb_signed_drivers.rar
k610i_usb_signed_drivers.rar
k618_usb_signed_drivers.rar
k630_usb_signed_drivers.rar
k660_usb_signed_drivers.rar
k750_usb_signed_drivers.rar
k758_usb_signed_drivers.rar
k770_usb_signed_drivers.rar
k790_usb_signed_drivers.rar
k800_usb_signed_drivers.rar
k810_usb_signed_drivers.rar
k818_usb_signed_drivers.rar
k850_usb_signed_drivers.rar
k858c_usb_signed_drivers.rar
s500_usb_signed_drivers.rar
t650i_usb_signed_vista_xp_drivers.rar
t658c_usb_signed_vista_xp_drivers.rar
v630_usb_signed_drivers.rar
v640_usb_signed_drivers.rar
w200_usb_signed_drivers.rar
w300_usb_signed_drivers.rar
w380_usb_signed_drivers.rar
w550_usb_signed_drivers.rar
w580_usb_signed_drivers.rar
w600_usb_signed_drivers.rar
w610_usb_signed_drivers.rar
w660_usb_signed_drivers.rar
w700_usb_signed_drivers.rar
w710_usb_signed_drivers.rar
00_usb_signed_drivers.rar
10_usb_signed_drivers.rar
30_usb_signed_drivers.rar
50_usb_signed_drivers.rar
80_usb_signed_drivers.rar
88_usb_signed_drivers.rar
90_usb_signed_drivers.rar
w900_usb_signed_drivers.rar
w908c_usb_signed_drivers.rar
w910_usb_signed_drivers.rar
w950_usb_signed_drivers.rar
z310_usb_signed_drivers.rar
z520_usb_signed_drivers.rar
z525_usb_signed_drivers.rar
z530_usb_signed_drivers.rar
z550_usb_signed_drivers.rar
z555_usb_signed_drivers.rar
z558_usb_signed_drivers.rar
z610_usb_signed_drivers.rar
z710_usb_signed_drivers.rar
z750_usb_signed_drivers.rar
z770i_usb_signed_drivers.rar
ALL_USB_Drivers_FOR CSCA{ALTBYPASS}_ONEPORT_WINXP_ONLY.rar
http://www.4shared.com/get/fLITOiUj/drivers_for_CSCA_ALTBYPASS__ON.html
HTC Gratia Hard Reset - Restore to Factory Default
This is a step by step instructions on how to hard reset the HTC Gratia.
htc gratia hard reset
Note: The result of this procedure may delete all data installed or stored on the HTC Gratia, we highly recommend to have a back up copy of all the personal data before proceeding. However, this process may or may not delete the data stored on the microSD memory card.
Here's how to Factory Reset the HTC Gratia through Menu Settings

1. From the Main Home Screen, select Menu
2. Select Settings, then Privacy
3. Select Factory Data Reset
4. Select Reset Phone
5. If the Password is required just enter it, then confirm by selecting Erase Everything
Hard Reset Procedure, if the HTC Gratia is frozen or hang up
1. If the HTC Gratia is frozen. Try to turn the Power Off first. If it won't respond pull the battery out and reinsert it back again after few seconds.
2. Hold the Volume Down button
3. Press and hold the Power button until the phone Turns On again.
4. A menu will then appears that let you choose for Fastbook, Recovery, Clear Storage, and Simlock
5. Select Clear Storage by pressing the Volume Down button
6. Press and then release the Power button
7. Select and confirm: Volume Up for YES and Volume Down for NO
Once the factory reset or wipe is complete, the phone will then reboot to its factory default settings.
All previously installed data on HTC Gratia including third-party application was already deleted.
htc gratia hard reset
Note: The result of this procedure may delete all data installed or stored on the HTC Gratia, we highly recommend to have a back up copy of all the personal data before proceeding. However, this process may or may not delete the data stored on the microSD memory card.
Here's how to Factory Reset the HTC Gratia through Menu Settings
1. From the Main Home Screen, select Menu
2. Select Settings, then Privacy
3. Select Factory Data Reset
4. Select Reset Phone
5. If the Password is required just enter it, then confirm by selecting Erase Everything
Hard Reset Procedure, if the HTC Gratia is frozen or hang up
1. If the HTC Gratia is frozen. Try to turn the Power Off first. If it won't respond pull the battery out and reinsert it back again after few seconds.
2. Hold the Volume Down button
3. Press and hold the Power button until the phone Turns On again.
4. A menu will then appears that let you choose for Fastbook, Recovery, Clear Storage, and Simlock
5. Select Clear Storage by pressing the Volume Down button
6. Press and then release the Power button
7. Select and confirm: Volume Up for YES and Volume Down for NO
Once the factory reset or wipe is complete, the phone will then reboot to its factory default settings.
All previously installed data on HTC Gratia including third-party application was already deleted.
HTC 7 Trophy Hard Reset - Wipe and Restore to ,Factory Default Settings
This is a step by step instruction on how to hard reset (factory reset) the HTC 7 Trophy and then restore it back to its original factory default settings.
Warning: Performing a Factory reset will permanently delete all your data and customized settings, and it will also remove all applications you’ve downloaded and installed on the device. Make sure to have a back up copy of any data and files you want to keep before you do a factory reset.

Performing a factory reset through Menu settings - basic method
1. From the home screen, swipe left to expose your app list
2. Select Settings
3. Scroll down and select about
4. Select Reset your phone
5. Select yes to confirm, then select yes to confirm again
If having problem how to turn on the phone or access the phone settings, or it become frozen or unresponsive you can still perform a factory reset by using the buttons of the phone.
Here's how to hard reset your HTC 7 Trophy via button combination.
1. Shut down the phone or turned it off, or remove the battery and then reinsert it back again.
press and hold the VOLUME UP and DOWN buttons, and then briefly press the POWER button.
2. Wait for the instructions to show on the screen on how to do the factory reset, and then release the VOLUME UP and DOWN buttons.
3. Follow the instructions onscreen how to factory reset your phone.
Then your HTC 7 Pro will then reboot and you'll be left with a factory fresh phone. All the application previously installed already deleted.
Warning: Performing a Factory reset will permanently delete all your data and customized settings, and it will also remove all applications you’ve downloaded and installed on the device. Make sure to have a back up copy of any data and files you want to keep before you do a factory reset.
Performing a factory reset through Menu settings - basic method
1. From the home screen, swipe left to expose your app list
2. Select Settings
3. Scroll down and select about
4. Select Reset your phone
5. Select yes to confirm, then select yes to confirm again
If having problem how to turn on the phone or access the phone settings, or it become frozen or unresponsive you can still perform a factory reset by using the buttons of the phone.
Here's how to hard reset your HTC 7 Trophy via button combination.
1. Shut down the phone or turned it off, or remove the battery and then reinsert it back again.
press and hold the VOLUME UP and DOWN buttons, and then briefly press the POWER button.
2. Wait for the instructions to show on the screen on how to do the factory reset, and then release the VOLUME UP and DOWN buttons.
3. Follow the instructions onscreen how to factory reset your phone.
Then your HTC 7 Pro will then reboot and you'll be left with a factory fresh phone. All the application previously installed already deleted.
HTC 7 Pro Hard Reset - Wipe and Restore to Factory Default Settings
This is a step by step instruction on how to hard reset (factory reset) the HTC 7 Pro and restore to factory default settings.

NOTE: Performing a Factory reset will permanently delete all your data and customized settings, and it will also remove all applications you’ve downloaded and installed on the device. Make sure to have a back up copy of any data and files you want to keep before you do a factory reset.
Performing a factory reset via Menu settings
1. From the home screen, swipe left to expose your app list
2. Select Settings
3. Scroll down and select about
4. Select reset your phone
5. Select yes to confirm, then select yes to confirm again
If having problem how to turn on the phone or access the phone settings, or it become frozen or unresponsive you can still perform a factory reset by using the buttons of the phone.
Here's how to hard reset your HTC 7 Pro via button combination.
1. Shut down the phone or turned it off, or remove the battery and then reinsert it back again.
press and hold the VOLUME UP and DOWN buttons, and then briefly press the POWER button.
2. Wait for the instructions to show on the screen on how to do the factory reset, and then release the VOLUME UP and DOWN buttons.
3. Follow the instructions onscreen how to factory reset your phone.
Then your HTC 7 Pro will then reboot and you'll be left with a factory fresh phone.
HTC Aria Hard Reset
Note: Please back up all of your personal data before you proceed. All data will be deleted on your HTC Aria by doing this procedure. However, this process will NOT delete data stored on the micro SD card.

1. Turn the power off. If your HTC Aria is frozen, pull the battery out and reinsert it
2. Hold the Volume Down button
3. Hold the Power button until the display turns on
4. You are now presented with a menu that allows for Fastbook, Recovery, Clear Storage, and Simlock
5. Select Clear Storage by pressing the Volume Down button
6. Press and release the Power button to select
7. Confirm: Volume Up for YES and Volume Down for NO
Once the wipe is complete, the HTC Aria will reboot to its factory fresh state.
HTC 7 Mozart T8699 Hard Reset - Restore Factory
Here's a step by step instruction on How to Hard Reset or Factory Reset the HTC 7 Mozart T8699
If the device becomes unresponsive or sluggish when opening some applications, try to restart the phone and observe if that helps.
To restart the phone, simply turn it off and back on again. If pressing and holding the POWER button doesn’t work, then remove the battery, wait for a few seconds, reinsert the battery, and then turn the phone on.
In case the phone has a persistent problem that cannot be solved, the last option is to do by a way of factory reset.
htc mozart hard reset

Performing a factory reset via settings
The most convenient way to do a factory reset is via the phone settings.
Factory reset is not a step to be taken lightly. It will permanently deleteall your data and customized settings, and will also remove any apps you’ve downloaded and installed on the device.
Please make sure to back up any data and files you want to keep before you do a factory reset.
Restarting or factory resetting your HTC 7 Mozart T8699 phone (soft reset) 1. From the home screen, swipe left to expose your app list
2. Select Settings
3. Scroll down and select About
4. Select Reset your phone
5. Select yes to confirm, then Select yes to confirm again
HTC Mozart T8699 factory reset (hard reset)
Performing a factory reset using phone buttons combination
If you cannot turn on your phone and cannot access the phone settings, you can still perform a factory reset by using the buttons on the phone.
1. Turn the device Power OFF, if the HTC Mozart T8699 is Frozen: press and hold the VOLUME UP and DOWN buttons, and then briefly press the POWER button.
2. Wait for the instructions to show on the screen on how to do the factory reset, and then release the VOLUME UP and DOWN buttons.
3. Just follow the step by step instructions onscreen to factory reset the phone.
It will then reboot and the HTC 7 Mozart will now be wiped and you'll be left with a factory fresh phone.
If the device becomes unresponsive or sluggish when opening some applications, try to restart the phone and observe if that helps.
To restart the phone, simply turn it off and back on again. If pressing and holding the POWER button doesn’t work, then remove the battery, wait for a few seconds, reinsert the battery, and then turn the phone on.
In case the phone has a persistent problem that cannot be solved, the last option is to do by a way of factory reset.
htc mozart hard reset
Performing a factory reset via settings
The most convenient way to do a factory reset is via the phone settings.
Factory reset is not a step to be taken lightly. It will permanently deleteall your data and customized settings, and will also remove any apps you’ve downloaded and installed on the device.
Please make sure to back up any data and files you want to keep before you do a factory reset.
Restarting or factory resetting your HTC 7 Mozart T8699 phone (soft reset) 1. From the home screen, swipe left to expose your app list
2. Select Settings
3. Scroll down and select About
4. Select Reset your phone
5. Select yes to confirm, then Select yes to confirm again
HTC Mozart T8699 factory reset (hard reset)
Performing a factory reset using phone buttons combination
If you cannot turn on your phone and cannot access the phone settings, you can still perform a factory reset by using the buttons on the phone.
1. Turn the device Power OFF, if the HTC Mozart T8699 is Frozen: press and hold the VOLUME UP and DOWN buttons, and then briefly press the POWER button.
2. Wait for the instructions to show on the screen on how to do the factory reset, and then release the VOLUME UP and DOWN buttons.
3. Just follow the step by step instructions onscreen to factory reset the phone.
It will then reboot and the HTC 7 Mozart will now be wiped and you'll be left with a factory fresh phone.
HTC Inspire 4G hard reset , format and restore to factory settings
Here's the simple step by step procedure on how to hard reset or format the HTC Inspire 4G and restore it back to factory default state settings.
Please note: All data and application installed or stored will be deleted on HTC Inspire 4G as a result of this process.
Just make sure to save all data and personalized application and settings installed before commencing the factory setting. Performing a hard reset is only advisable if the HTC Inspire 4G experiencing application problem like freezing, hang up or halting etc. This process will restore the device to its original factory default state.
However, this process does not delete the data stored on the microSD memory card. Just back up it first before you proceed.

Resetting through Menu Settings
1. On the main home screen, select menu
2. Select Settings, then Privacy
3. Select Factory data reset
4. Select Reset phone
5. Enter your password if prompted, then select Erase everything upon confirmation
If the device is frozen, Do a hard reset through button combination:
1. If your HTC Inspire 4G is frozen, Turn the power off or then pull the battery out and put it back again
2. Hold the Volume Down button
3. Briefly Press and hold the Power button until the device power on
4. A menu will appear that allows you to choose for Fastbook, Recovery, Clear Storage, and Simlock
5. Select Clear Storage by pressing the Volume Down button
6. Press and then release the Power button
7. A confirmation menu will appear: Volume Up for YES and Volume Down for NO
Note: selecting YES will erase all data including apps and games installed; if you choose YES then the erasing process will start. Once the wipe is complete, All data including third-party applications already deleted. The phone will automatically reboot and turn back on to default factory setting.
Please note: All data and application installed or stored will be deleted on HTC Inspire 4G as a result of this process.
Just make sure to save all data and personalized application and settings installed before commencing the factory setting. Performing a hard reset is only advisable if the HTC Inspire 4G experiencing application problem like freezing, hang up or halting etc. This process will restore the device to its original factory default state.
However, this process does not delete the data stored on the microSD memory card. Just back up it first before you proceed.
Resetting through Menu Settings
1. On the main home screen, select menu
2. Select Settings, then Privacy
3. Select Factory data reset
4. Select Reset phone
5. Enter your password if prompted, then select Erase everything upon confirmation
If the device is frozen, Do a hard reset through button combination:
1. If your HTC Inspire 4G is frozen, Turn the power off or then pull the battery out and put it back again
2. Hold the Volume Down button
3. Briefly Press and hold the Power button until the device power on
4. A menu will appear that allows you to choose for Fastbook, Recovery, Clear Storage, and Simlock
5. Select Clear Storage by pressing the Volume Down button
6. Press and then release the Power button
7. A confirmation menu will appear: Volume Up for YES and Volume Down for NO
Note: selecting YES will erase all data including apps and games installed; if you choose YES then the erasing process will start. Once the wipe is complete, All data including third-party applications already deleted. The phone will automatically reboot and turn back on to default factory setting.
HTC ThunderBolt 4G Hard Reset or Format to Factory Settings
Just make sure to save all data and personalized application and settings installed before commencing the factory setting. Performing a hard reset is only advisable if the HTC ThunderBolt 4G experiencing application problem like freezing or hang etc. This process will restore the device to its...
HTC ChaCha Format, Hard Reset to factory default
Here's the step by step procedures how to hard reset the HTC ChaCha to clear all data and restore it back to its original factory fresh default settings. Please Note: The result of this procedure will delete all data stored from the HTC Salsa. The data
data
stored on the microSD memory card ...
datastored on the microSD memory card ...
LG Optimus One P500 Hard Reset , restore to factory setting
Here's, a step by step instructions how to hard reset the LG Optimus One P500 to clear all data and restore its original factory default settings.

Note: As a result of this procedure, all data and application installed on LG Optimus One P500 will be deleted or cleared. However, this process may or may not delete data stored on the microSD memory card. We advice to back up all of your personal data before proceeding.
Factory Reset on Menu Setting
1. From the main home screen, tap menu
2. Select Settings, then Privacy
3. Select Factory data reset
4. Select Reset phone
5. Enter the password if required, then confirm by selecting Erase everything
If the phone is frozen, hard reset it through buttons
1. Turn the power off. If the phone is frozen, pull the battery out and inplace it back again
2. Hold the Home and Volume Down button
3. Press and hold the Power button until the phone turns on
4. Follow the on-screen instructions to hard reset the phone handset
The LG Optimus One P500 will then reboot to its factory fresh default state settings.
Sony Ericsson Xperia X8 Hard Reset
Here's, how to hard reset the Sony Ericsson Xperia X8 with simple step by step instructions.
Sony Ericsson Format
Please note this process will delete all data from the Sony Ericsson Xperia X8 , but may or may not delete the data stored on the microSD memory card. Do have a back up or a copy of all your personal data before you may proceed.
Restore through the Main Home Screen Settings
1. From the Main Home Screen, select Menu
2. Select Settings, then select Privacy
3. Select Factory Data Reset
4.Then Reset Phone
5. Enter the Password if prompted or required, then select Erase Everything.
If the phone is frozen: You can Hard Reset it trough key combination.
1. Turn the power off first. If the Sony Ericsson Xperia X8 is frozen, take the battery out from the device and then reinsert it back again after a few seconds.
2. Hold the Left and Right Keys located beneath the LCD Display
3. Press and release the Power Key
4. Just then follow the on-screen instructions that appears to hard reset the Sony EricssonXperia X8
Once the wipe process is complete, the phone will then reboot to its factory fresh default state settings.
All data including third-party applications already deleted from the Sony Ericsson Xperia X8.You may need to reinstall it back again.
all mobile unlock master code
O2x1
reset password *#9999#
Hang talk and power button together
[??]secret motorola mpx200 codes engineering menu, test mode, logs, etc.
Enter in the top secret 'Engineering Mode' on your MPx200 entering:
*#**364# on your keypad then press the Green Button
other interesting codes are:
* # * * 3 7 2 # FQC (test mode)
* # * * 3 6 4 # Engineering menu
* # * * 2 6 6 * 0 # Set as data COM port
* # * * 2 6 6 * 1 # Set as log COM port
* # * * 7 9 7 # Time to failure timer & Power down code
* # * * 2 2 6 3 * 0 # Set to default Band
* # * * 2 2 6 3 * 1 # Disable GSM Band
* # * * 2 2 6 3 * 2 # Disable DCS Band
* # * * 2 2 6 3 * 3 # Disable EGSM and DCS Band
* # * * 2 2 6 3 * 4 # Disable PCS Band
* # 9 9 9 # which displays the command log
* # * * 8 3 7 # Version info (some roms doesnt have implemented)
Remember guys play at your own risk
L6 i-mode Codes
--------------------------------------------------------------------------------
This Mitsibushi codes work with L6 i-mode
hold * 65512890 for reset
hold * 5806 sw version
hold * 487989 NS lock menu
hold * 482896 CP
hold * 574243 NS
hold * 967678 SP
hold * 362628 IMSI
hold * 787090 Lock net level
hold * 787292 Lock net level
TSM30
FULLRESET CODE
##*#9374 and press ok , b ::Service Codes::
##**9987
Alcatel
Master Codes
- 25228352
- 25228353
- 83227423 (***/4,BH4,BF5,BG3,BF3/4..)
###337*07# - master reset (with SIM)
###847# - factory reset (with SIM)
Alcatel 835 formating - **0102#
Samsung
*2767*3855# - FULL E2P RESET
*2767*2878# - CUSTOM E2P RESET
#*7337# - UNLOCK
*2767*688# - UNLOCK
*#0523# - CONTRAST
*#9998*523# - CONTRAST
*#8999*8378# - Service Menu (X100)
For zv10 unlocking
*7465625*228#
Tested !
Philips
#20021208# ok - 630 without SIM (erase flash)
*#7728*# - RSAV DONE
*#3849*# - ??? reboot
*#3851*# - ??? reboot
Philips 568 *01763*737381# - reset
Pantech
*01763*737381# - master reset (user data, user code) without SIM
*01763*8371# - SW version
*01763*6371# - UNLOCK
*01763*3641# - Menu
Panasonic
reset(format) **7370# tryed and tested on my x700
*01763*737381# - master reset (user data, user code) A100, A101, A102,G50, G51, G70, GD55..
*369#(*) - MENU
7, 4, 6, menu, menu - lock menu
*#9999# - 5 sec after power on - SW version (GD75, GD67, GD87..)
**7370#
**00012*00000000#
**00032*00000000#
LG
2945#*# - service menu (code reset)(W3000 G5300 C1200 G7100...)
2945#(*)- hold (LG 500,600)
B1200 *+pwr, 6,6,8 Service Menu
B1300 *+pwr, 1,5,9 Service Menu
Security Removing Code For Lg 8110,8120.
47328545454#
Or
277634#*#
LG
2945#*# - service menu (code reset)(W3000 G5300 C1200 G7100...)
2945#(*)- hold (LG 500,600)
B1200 *+pwr, 6,6,8 Service Menu
B1300 *+pwr, 1,5,9 Service Menu
Security Removing Code For Lg 8110,8120.
47328545454#
Or
277634#*#
U8180 old ...............49857465454#
U8180 new .............492662464663#
U8330 ...................637664#*#
U8360 ...................*6*41*12##
U8380 ...................525252#*#
ALL LG 2G : 2945#*#
8110 & 8120 : 277634#*#
U8130 & U8138 : 47328545454#
8180 old sw : 49857465454#
8180 new sw : 492662464663#
8330 : 637664#*#
8360 : *6*41*12##
8380 : 525252#*#
LG 8550 885508428679#*#
Phone
Service Menu Code
8110 277634#*#
8120 277634#*#
8130 47328545454#
8138 47328545454#
8180 v10A 49857465454#
8180 v11A 492662464663#
8330 637664#*#
8360 *6*41*12##
8380 525252#*#
8550 885508428679#*#
Phone
Unlock Menu Code
Older phones 2945#*88110#
U880
was told that unlocking code for the phone is "0794070061"
and method is to enter 142358#*#
but when i enter above code instead of asking for nck code it restarts(phone is temporary unlocked with sim inside).
Plz help how to unlock it permanently
After complete Flashing just Enter 142358#*#
Sony-Ericsson
> * < < * < * - Service menu
< * * < - Lock menu
VK Mobile
*#79# - SW version
*#85*364# (*) - hold menu
855855# without SIM (VG107)
85558555#(*)-hold
4268#(*)-hold (VG207)
Voxtel
0124 - master code
0718#(*)- hold - menu (ST11, SC10, V100 without SIM)
4268#(*)- hold - show code (ST11, SC10 without SIM)
*789(#)- hold - menu (V50, V300, RX100 without SIM)
Motorola
c350 english languge
menu
setting
1 1 5 2 6
(T190, T191, T205) master code
- 19980722
- 20010903
**********
P2K test menu:
*#06#, menu, menu, 048263*
Test comands:
32*116*1*0*0 - read phone code
32*118*1*0*0 - read security code
18*0 - factory reset, phone code off
18*1 - master reset
54*18*1 - full phone reset
10*0*6 - select 900/1800
32*279*1*0*8 - model
32*383*1*0*0 - flex version
Hard reset MPX200, MPX220 - blue button + power on
Nokia
*#7370925538# (valet code reset) 6230
*#746025625# [*#sim0clock#]
*#92702689# [*#war0anty#]
Fly Bird
S688 - #*301#02# send - with SIM
menu:
7 - 10 - ok,
#*8000#, #*3676# (reboot repair)
V09, S1180 - *, 3 times down, 3 times up - service menu
Enol
*#987*00# - Service menu
*#987*99# - Full reset
*#900# - SW version
Maxon
*#9922# - menu, reset (without SIM)
*#9900# - Software Version
*#9901# - Software Version (PBatch)
S60 Siries (SX1, 6600, N-Gage..)
*#7780# - factory default
*#7370# - full factory defaults (all user data reset)
SX1 formating - * + # + power on
6600 formating - 3 + * + send + power on
Sendo X1 formating - 5 + power on
Mitsubishi
*65512890 (*-hold) format FFS (Eclipse)
* 3926 - (*-hold) test mode
* 5806 - (*-hold) SW version
*(hold) 787090 - trium 320 unlock menu
Huawei (cdma)
MASTER SECURITY CODE
-309296
-3092
-9296
Pantech HX-550C (cdma)
Full reset (phone code reset)- ##03*934#9367*192#397#7412569746 PWR,
after reset - ##27732726 PWR and select "with uim"
Samsung
#7465625*638*12345678#
::Service Codes::
Alcatel
Master Codes
- 25228352
- 25228353
- 83227423 (***/4,BH4,BF5,BG3,BF3/4..)
###337*07# - master reset (with SIM)
###847# - factory reset (with SIM)
Alcatel 835 formating - **0102#
Samsung
*2767*3855# - FULL E2P RESET
*2767*2878# - CUSTOM E2P RESET
#*7337# - UNLOCK
*2767*688# - UNLOCK
*#0523# - CONTRAST
*#9998*523# - CONTRAST
*#8999*8378# - Service Menu (X100)
Philips
#20021208# ok - 630 without SIM (erase flash)
*#7728*# - RSAV DONE
*#3849*# - ??? reboot
*#3851*# - ??? reboot
Philips 568 *01763*737381# - reset
Pantech
*01763*737381# - master reset (user data, user code) without SIM
*01763*8371# - SW version
*01763*6371# - UNLOCK
*01763*3641# - Menu
Panasonic
*01763*737381# - master reset (user data, user code) A100, A101, A102,G50, G51, G70, GD55..
*369#(*) - MENU
7, 4, 6, menu, menu - lock menu
*#9999# - 5 sec after power on - SW version (GD75, GD67, GD87..)
Sony-Ericsson
> * < < * < * - Service menu
< * * < - Lock menu
j300 lcd reset
( -> *1*2*1* )
VK Mobile
*#79# - SW version
*#85*364# (*) - hold menu
855855# without SIM (VG107)
85558555#(*)-hold
4268#(*)-hold (VG207)
VKMobile?
Code 1: *#85*364# (hold * key in few second) --> Enter the hidden menu
Code 2: 3807 # (hold * key in few second) --> Enter the test mode.
Voxtel
0124 - master code
0718#(*)- hold - menu (ST11, SC10, V100 without SIM)
4268#(*)- hold - show code (ST11, SC10 without SIM)
*789(#)- hold - menu (V50, V300, RX100 without SIM)
Motorola
(T190, T191, T205) master code
- 19980722
- 20010903
**********
P2K test menu:
*#06#, menu, menu, 048263*
Test comands:
32*116*1*0*0 - read phone code
32*118*1*0*0 - read security code
18*0 - factory reset, phone code off
18*1 - master reset
54*18*1 - full phone reset
10*0*6 - select 900/1800
32*279*1*0*8 - model
32*383*1*0*0 - flex version
Hard reset MPX200, MPX220 - blue button + power on
Nokia
*#7370925538# (valet code reset) 6230
*#746025625# [*#sim0clock#]
*#92702689# [*#war0anty#]
9210i formatting
remove the battary
Hold down Ctrl + Shift
put in the battary
keep waiting and holding the Ctrl + Shift
when you see the nokia hands logo press ( F )
Fly Bird
S688 - #*301#02# send - with SIM
menu:
7 - 10 - ok,
#*8000#, #*3676# (reboot repair)
V09, S1180 - *, 3 times down, 3 times up - service menu
Enol
*#987*00# - Service menu
*#987*99# - Full reset
*#900# - SW version
Maxon
*#9922# - menu, reset (without SIM)
*#9900# - Software Version
*#9901# - Software Version (PBatch)
S60 Siries (SX1, 6600, N-Gage..)
*#7780# - factory default
*#7370# - full factory defaults (all user data reset)
SX1 formating - * + # + power on
6600 formating - 3 + * + send + power on
Sendo X1 formating - 5 + power on
Mitsubishi
*65512890 (*-hold) format FFS (Eclipse)
* 3926 - (*-hold) test mode
* 5806 - (*-hold) SW version
*(hold) 787090 - trium 320 unlock menu
Huawei (cdma)
MASTER SECURITY CODE
-309296
-3092
-9296
Huawei ETS-668, 678, 688, etc Nam Programming:
Debug Mode: ##44+Menu
Debug Screen: ##33+Menu
CDG2 Test enable: ##234+Menu
CDG2 Test disable: ##432+Menu
China Lang Select: ##123+Menu
Blocking Debug Code: ###888+Menu
Home System Only On: ##461+Menu
Home System Only Off: ##460+Menu
Pantech HX-550C (cdma)
Full reset (phone code reset)- ##03*934#9367*192#397#7412569746 PWR,
after reset - ##27732726 PWR and select "with uim"
NEC
Repair please wait on NEC N2xx
*#3727372#
IMEI *#06#
Version * # 2820 #
hardware reset *73738# (send?)
Lock info * # 3210 # (send?) - SP lock
* # 8140 # (send?) - Net lock
SIM LOCK
*#4960 # (send?) - info
*4960*pass*pass#(send?) -lock
#4960*pass#(send?) -unlock
Lock Status * # 3210 # (send?) - SP lock
* # 8140 # (send?) - Net lock
*#CODE#
CODES :
06 IMEI
7468658 SIM INFO
746255 SIM INFO
7464674 IMSI
2820 SW WERSION
79837 SW + DSP WERSION
49837 ****************
79786 Checksum
28453 Build Levev
737425 SERIAL NUMBER !!!!
73738 -
737247 Reapir History
7463424 SIMM Diagnostics
284538 Build Date
84769 Power ON
497837 Hysteresis
3643278746 Enhanced speed
3648658746 3 Volt Sim
347722 Clear Cause
627538 Market
7320 Network Lock
4960 USIM Card Lock
3210 SP Lock
8140 Coorporate Lock
5830 Unlocking Code !!!
6210 MSISDN - Current Phone Number
TSM
To check lock type in TSM3/4/5/5m?
Turn ON the phone and type: *#9917#
To enter Unlock Code in TSM100?
Type: ****987 + Call
To Enter Unlock Code in TSM100v/TSM30?
Type: ##**9987 + Call
SHARP
sharp reset EEP
1, push at once key 0+3+right option key up+red key (white screen)
2, in sequence push key 0,1,2,3, right option key up,1 (service menu)
3, write 99 and push right option key up
4, write 01 and push right option key up (now start RESET EEPROM)
Wait.....
5, push any key
6, push blue key menu (save)
7, power off
Sharp GX-10 unlock solution
With Sim Card (of locked network) in phone:
*01763*6371# and press M.
In menu go to: SETTINGS->SELECT->SECURITY
then in Security menu:MEP LOCKS->SELECT
insert default security code 0000
In menu go to NETWORK and choose DEACTIVATE
press SELECT and insert 812664697614
Press OK, phone anwser will be: DONE .
phone unlocked
Sarp Gx15/20/30 Tm100
Phone is on test mode
you can see **** on phone display
For finishing unlock folow the next steps :
Press 1 on phone keypad
Press 99
Press right top key
Press 3 FOR UNLOCK
or Press 1 FOR FACTORY DEFAULT
Press roight top key
Wait to see on display format ok
Press right top key 3 times or more until phone is off
MAXON
for MAXON
*#9917#
#9917*network code#
#9917*part IMSI#
#9917*simlock SLPUK#
#9917*IMSI#
SG1000 Master Code Unlock 24681357
SG1000 Security Code Unlock *#*#1705#46 +ok (EEP reset)
this code is for enter in serviçe menu *#*#1705#
for innostream:
*741*7373868# reset ok
heck version *888*837#
Engineering Mode *888*888#
Master Reset *741*737381#
*741*737381#
*741*737382#
THOMSON
the code 49006045
AND TO ENTER CODE PUT 878 wit sim
Sony
Codes for the J-Series
*#06# : Displays IMEI number
*#00xx# : Changes language (xx is your country code)
*#000# ... *#0000000# : Resets language to auto-selection
*#7465625# = *#simlock# : Displays SIM lock status
*#7353273# = *#release# : Display firmware version
*#78737322867973738# = *#superfactoryreset# : Resets personal data (remove SIM card first)
*#73287489263373738# = *#securitycodereset# : Resets security code to 0000 (remove SIM card first)
*09*(PIN code)# : Turns PIN code on
#09*(PIN code)# : Turns PIN code off
Sagem
If you search here in the forum sure you will find the answer , this forum is really a big library then next time i suggest ti you to use the usefull search button.....
For example your IMEI is 35074635268234-2
take the four last digits without the 15th digit
you have 8234 ----> 8+2+3+4 = 17 modulo 10 = 7 then x =7
if your firmware is
DJ3,5C or DJ3,5D or DJ3,5E or DH3,5H then y=5
else if your firmware is
DF4,5E or DF4,5F or DH4,6J or DJ4,6G or DG4,5H or DI4,6G then y=4
else if your firmware is
JC3,6N or JC3,6O or JC3,6L then y=2
Now power on your phone without sim and put : *226632623XY and Ok
Salam
For the last time on this forum...
TEST MODE CAN'T BE ENTERED ON MYX3D, MYX5D, MIX5M, MYX6 SAGEM MODELS !!! SO STOP POSTING STUPID REQUESTS FOR TEST MODE CODE FOR THESE PHONES. STOP MYX6 UNLOCK CODE REQUESTS AS THERE IS NO CALC FOR IT YET AND PROVIDED FIELDS ARE UNUSEFULL.
TEST MODE CAN BE ENTERED ON MW/MC9XX, MW/MY30XX, MYX3, MYX5:
FOR MW/MC9XX:
*0287257X WHERE X IT'S AN NUMBER BEETWEN 0 AND 9
FOR MW/MY30XX:
WITH DX4,X FIRMWARE
*2266326234Y WHERE Y=LAST FOUR IMEI DIGITS(WITHOUT CHECK DIGIT) ADDED MOD 10. MOD 10 MEANS THE REST BY DIVISION OF 10.
WITH DX3,X FIRMWARE
*2266326233Y WHERE Y=LAST FOUR IMEI DIGITS(WITHOUT CHECK DIGIT) ADDED MOD 10. MOD 10 MEANS THE REST BY DIVISION OF 10.
FOR MYX3, MYX5:
*226632623XY WHERE Y=LAST FOUR IMEI DIGITS(WITHOUT CHECK DIGIT) ADDED MOD 10. MOD 10 MEANS THE REST BY DIVISION OF 10. X IT'S FIRMWARE DEPENDENT AND CAN BE A NUMBER BETWEEN 0 AND 9.
U CAN ACCESS FIEL 94 ? THAT'S PERFECT ! WRITE TO FIELD 94 VALUE 0X01 AND U'LL PHONE (M51 AND ABOVE MODELS) WILL BE IN PERMANENT TEST MODE.
best regards,
.:hack3r2k:.
Qantech
sp unlocking
*01763*737381#
Default
MOTOROLA TEST MODE :
v60, c120, c331, etc:
1) Turn on the phone. Press MENU 0 7 3 8 8 7 *
2) The phone will require you to "Enter a Security Code", press 000000, OK
3) Scroll down to "Test mode" choose SELECT. Scroll down to "Enable"
choose SELECT. Your phone is now in test mode.
4) Signal strength is the 3_rd number down on the left hand side of the screen.
5) To toggle between regular mode and test mode: Press MODE then
quickly press the BUTTON DIRECTLY TO THE LEFT OF MENU.
6) To turn off the test mode the phone must be in regular mode, then follow
the above sequence and scroll down to where it says "DISABLE" instead of
"ENABLE" and choose select.
Motorola Bible - bible.txt
<>
lgc-300, etc Nam Programming :
Nam Set: Menu, 9, Spc
A-key: Press "Sto" 3sec, 2539**
lgc-330w, etc Nam Programming :
Nam Set: Menu, 4, 0, Spc
A-key: 2539**
lgc-510, v111, etc Nam Programming :
Nam Set: Menu, 3, 0, Spc
A-key: 2539**
lgc-500, 800w, etc Nam Programming :
Nam Set: Menu, 9 , 0, Spc
Debug Mode: Menu, 7, 0, Fsc
Debug Mode: Menu, 8, 0, Fsc
A-key: 2539**
Lg LX,VX-series, VX4400, VX6000, etc Nam Programming :
Nam Set: ##Spc
Nam Set: Menu, 0
Advanced Settings: ##2342
Vocoder: ##8626337,ok
CAI Change: ##7738,ok
Enable TTY: ##889,ok
A-key: ##2539,ok
Reset (Life time, Clear Memory, etc): ##786,ok
<>
Sky All Models Nam Programming :
Nam Set: #7583538324#626#
Nam Set: *759#364*7388464#
Min simple mode: #758353266#646#
Irm simple mode #758353266#476#
Voice memo: #8767#277#
Test Mode: #7583538324#8378#
A-key: #758353266#2539#
Service Menu: Menu+4+0+Spc
Service Menu: Menu+5+0+Spc
<>
Withus wce-100, 200, 300, etc Nam Programming :
Nam Set: ##948487+Save
Nam Set: ##948482+Save
Nam Set: ##66835+Save
SMS Settings: ##76766
NVM Rebuild: ##777464
<>
Hyundai hwp-110 Nam Programming :
Nam Set: #86904**89397#
DM Mode: ##2740*
(Open phone, inter code, close phone)
Hyundai hgc-120, 130, 200 Nam Programming :
Nam Set: #86904**89397#
Hyundai hgc-310, 600, 610 Nam Programming :
Nam Set: ##20022002+Pwr+1+Spc Code
Field Test: ##20022002+Pwr+1+Master Code
Hyundai Curitel h-100, 150, hx-510b, 520 Nam Programming :
Nam Set: ##20022002+Pwr+1+Spc Code
Field Test: ##20022002+Pwr+1+Master Code
A-key: 2539**
Debug Menu: ##27732726+Pwr
Sar Test: ##27752345+Pwr
Baud Rate: ##36**+Pwr
DM Mode Enable: **1004+Pwr
DS Mode Enable: **1005+Pwr
Test Bell/Voice/Led/Dot: ##1122+Pwr
RF Mode: ##2240+Pwr
Ras Ram: ##2774+Pwr
Cmux1: **0481+Pwr
Cmux2: **0482+Pwr
RX Mode Fax: **0492+Pwr
RX Mode Data: **0491+Pwr
RX Mode Reset: **0490+Pwr
<>
Huawei ETS-668, 678, 688, etc Nam Programming :
Debug Mode: ##44+Menu
Debug Screen: ##33+Menu
CDG2 Test enable: ##234+Menu
CDG2 Test disable: ##432+Menu
China Lang Select: ##123+Menu
Blocking Debug Code: ###888+Menu
Home System Only On: ##461+Menu
Home System Only Off: ##460+Menu
<>
Ericsson A1228c, T61, etc Nam Programming :
Short NAM: 987+Menu
Long NAM: 923885+Menu+Spc
CDMA Mode: 904093+Menu
Analog Mode: 904095+Menu
QNC: 904097+Menu
Debug Screen: 904090+Menu
DM Mode: 904050+Menu
Sony-Ericsson T608 Nam Programming :
Nam Set: 923885, Joystick to the right, 111111
<>
Epsilon vc-5x Nam Programming :
Nam Set: **147258963##
Programming1: **1232580##
Programming2: **321456987##
Version: **1470963##
Debug: **000000##
Menu_1: **078987##
Menu_2: **1234756##
A-key: 2539**
Reset: **14789##
<>
VK-100C, 110C, 200C, etc Nam Programming :
Nam Set: 153147539741593
Test Mode: 153147539123258 (88 - clear efs)
< >
Z510, Z710i(gcd-456) Nam Programming :
Nam Set: Menu+0+Spc
<>
AMC450 Nam Programming :
Nam Set: *74269#*748#96148063+SEL
<>
ZTE C150 Nam Programming:
Nam Set: *983*3641#
<>
Gtran gcp-2000 Nam Programming :
Nam Set: 01#737+Spc
Debug Menu: 01#324+Spc
Debug Mode: 01#727
Test Mode: 01#764+Spc
System Test Mode: 01#768+Spc
Gtran gcp-5000 Nam Programming :
Debug Mode: 01#727+Spc
Test Mode: 01#765
<>
PANASONIC TEST MODE :
Panasonic (Most):
1) Turn on the phone. Press #7764726# choose SEND
2) Scroll down to where it says "NAM 1" and choose OK. Scroll down
to "Access To Level 4" choose YES. Scroll down to "Built-In-Monitor"
and choose EDIT.
3) Press 1 and choose OK then choose BACK. The phone will say
"Back To Level 1" choose YES. Now choose EXIT the phone will ask you
"Exit And Save Change" choose YES.
4) Signal strength is the top right number on the screen.
5) To turn off the test mode follow the above sequence except press 0
instead of 1 at the "Built-In-Monitor"
<>
Synertek S200 Nam Programming :
Nam Set: Menu+0+Spc
Debug Mode:
Test vibro/rx/tx: ##5555+Save
Debug Screen: ##33+Save
Debug Screen: ##523+Save
RF Test: ####+Save
Unknown code: ##325+Save
<>
Sony CM-M1300, 3300, Z200 Nam Programming :
Nam Set: 111111+Ok(Jog Dial)+Select+Programming+Ok+Spc
How to remove memory card Password
Click Here
GSM CODES
LG
To see version on LG 81X0
277634#*#
To enter unlock code :
2945#*88110#
IMEI (ALL): * # 06 #
IMEI and SW (LG 510): * # 07 #
software version (LG B1200 ): * 8375 #
recount cheksum (LG B1200 ): * 6861 #
factory test (B1200): #PWR 668
unknow (LG 500 ): 8060#*
unknow(LG 200 ) *789# + send
unknow (LG 500 ): 9270#* and 9278#*
Simlock menu (LG B1200): 1945#*5101#
Simlock menu (LG 510W, 5200): 2945#*5101#
Simlock menu (LG 7020, 7010): 2945#*70001#
Simlock menu (LG 500, 600 ): 2947#*
lg 5300 :2945#*5301#
how to read data calcfor LG510w:
just read button not read cal. data
adress: 0x1000004
size: 0x438
then read.
MAXON
*#9917#
#9917*network code#
#9917*part IMSI#
#9917*simlock SLPUK#
#9917*IMSI#
SG1000 Master Code Unlock 24681357
SG1000 Security Code Unlock *#*#1705#46 +ok (EEP reset)
this code is for enter in serviçe menu *#*#1705#
Mitsibushi
*#06# View IMEI
*#0044# English
*#0049# Deutsch
hold * 4329 Net Monitor1
hold * 621342 Net Monitor2
hold * 5472 M4 Testmode
hold * 5806 SW version
hold * 5807 HW version
hold * 936505 SW and HW version
hold * 482896 CP Lock Menu
hold * 574243 NS Lock Menu
hold * 967678 SP Lock Menu
hold * 362628 IMSI Lock Menu
hold * 787090 Lock net.level
hold * 787292 Lock net.level
Firmware Press and hold C, enter 597, release C
secret menu Press and hold C, enter 987, release C.Press OK
debug mode Press and hold C, enter 397, release C
phase-2 mode Press and hold C, enter 499, release C
Turn off phone Press and hold C, enter 999, release C
Motorola
*#06# Imei Number.
Motorola 8400 Secret Codes
IMEI Nummer *#06#
Telefonbuch“ aus dem Menü lÃschen [],[],[],003,[],1,[] und “okay”
Telefonbuch“ im Menü hinzufügen [],[],[],003,[],0,[] und „okay“
Monitormodus [],[],[],113,[],1,[]
Monitormodus deaktivieren [],[],[],113,[],0,[]
Ausgangszustand [],[],[],070,[],0,[]
Motorola 8700 Secret Codes*
IMEI Nummer *#06#
Telefonbuch“ aus dem Menü lÃschen [],[],[],003,[],1,[] und “okay”
Telefonbuch“ im Menü hinzufügen [],[],[],003,[],0,[] und „okay“
Monitormodus [],[],[],113,[],1,[]
Monitormodus deaktivieren [],[],[],113,[],0,[]
Ausgangszustand [],[],[],070,[],0,[]
Motorola T 2288 Secret Codes
IMEI Nummer *#06#
Motorola P 7389 Secret Codes
IMEI Nummer *#06#
Motorola L 7089 Secret Codes
IMEI Nummer *#06#
Motorola V 3688 Secret Codes
IMEI Nummer *#06#
Motorola V 3690 Secret Codes
IMEI Nummer *#06#
** Das Zeichen [] erhalten Sie, indem Sie die *-Taste länger gedrückt halten
NEC
IMEI *#06#
Version * # 2820 #
hardware reset *73738# (send?)
Lock info * # 3210 # (send?) - SP lock
* # 8140 # (send?) - Net lock
SIM LOCK
*#4960 # (send?) - info
*4960*pass*pass#(send?) -lock
#4960*pass#(send?) -unlock
pass is 8 digits
Lock Status * # 3210 # (send?) - SP lock
* # 8140 # (send?) - Net lock
code for repair n21 n22 n223
*#3727372#
Nokia
Nokia 1610 Secret Codes
IMEI Nummer *#06#
Software Version *#170602112302#
1. Zeile Software Version
2. Zeile Datum der Software
3. Zeile Typ des Telefons
Nokia 2010 Secret Codes
IMEI Nummer *#06#
Software Version *#9999#
1. Zeile Software Version
2. Zeile Datum der Software
3. Zeile Typ des Telefons
Nokia 2110 Secret Codes
IMEI Nummer *#06#
Software Version *#9999#
1. Zeile Software Version
2. Zeile Datum der Software
3. Zeile Typ des Telefons
Nokia 2110e Secret Codes
IMEI Nummer *#06#
Software Version *#170602112302#
1. Zeile Software Version
2. Zeile Datum der Software
3. Zeile Typ des Telefons
Firmware-Datum *#3283# bzw. *#DATE#
Nokia 2110j Secret Codes
IMEI Nummer *#06#
Software Version *#682371158412125#
1. Zeile Software Version
2. Zeile Datum der Software
3. Zeile Typ des Telefons
Firmware-Datum *#3283# bzw. *#DATE#
Nokia 3110 Secret Codes
IMEI Nummer *#06#
Software Version *#0000# bzw. *#9999# bzw. *#3110#
1. Zeile Software Version
2. Zeile Datum der Software
3. Zeile Typ des Telefons
Werkseinstellungen *#7780#
Simlock info *#92702689#
Nokia 3210 Secret Codes
IMEI Nummer *#06#
Software Version *#0000#
1. Zeile Software Version
2. Zeile Datum der Software
3. Zeile Typ des Telefons
Servicemenü *#92702689#
1. Seite IMEI
2. Seite Herstellungsdatum
3. Seite Kaufdatum
4. Seite Letzte Reparatur/Upgrade
5. Seite Transfer User Data
EFR de/aktivieren *#3370#
Half Rate de/aktivieren *#4720#
Testmodus aktivieren *#746025625#
Nokia 5110 Secret Codes
IMEI Nummer *#06#
Software Version *#0000#
1. Zeile Software Version
2. Zeile Datum der Software
3. Zeile Typ des Telefons
Servicemenü *#92702689#
1. Seite IMEI
2. Seite Herstellungsdatum
3. Seite Kaufdatum
4. Seite Letzte Reparatur/Upgrade
5. Seite Transfer User Data
EFR de/aktivieren *#3370#
Half Rate de/aktivieren *#4720#
Testmodus aktivieren *#746025625#
Provider lock status *#pw+1234567890+1
Network lock status #pw+1234567890+2
Provider lock status #pw+1234567890+3
SimCard lock status #pw+1234567890+4
Nokia 5120 Secret Codes
IMEI Nummer *#06#
Software Version *#0000#
1. Zeile Software Version
2. Zeile Datum der Software
3. Zeile Typ des Telefons
Servicemenü *#92702689#
1. Seite IMEI
2. Seite Herstellungsdatum
3. Seite Kaufdatum
4. Seite Letzte Reparatur/Upgrade
5. Seite Transfer User Data
EFR de/aktivieren *#3370#
Half Rate de/aktivieren *#4720#
Testmodus aktivieren *#746025625#
Provider lock status *#pw+1234567890+1
Network lock status #pw+1234567890+2
Provider lock status #pw+1234567890+3
SimCard lock status #pw+1234567890+4
Nokia 5130 Secret Codes
IMEI Nummer *#06#
Software Version *#0000#
1. Zeile Software Version
2. Zeile Datum der Software
3. Zeile Typ des Telefons
Servicemenü *#92702689#
1. Seite IMEI
2. Seite Herstellungsdatum
3. Seite Kaufdatum
4. Seite Letzte Reparatur/Upgrade
5. Seite Transfer User Data
EFR de/aktivieren *#3370#
Half Rate de/aktivieren *#4720#
Testmodus aktivieren *#746025625#
Provider lock status *#pw+1234567890+1
Network lock status #pw+1234567890+2
Provider lock status #pw+1234567890+3
SimCard lock status #pw+1234567890+4
Nokia 5190 Secret Codes
IMEI Nummer *#06#
Software Version *#0000#
1. Zeile Software Version
2. Zeile Datum der Software
3. Zeile Typ des Telefons
Servicemenü *#92702689#
1. Seite IMEI
2. Seite Herstellungsdatum
3. Seite Kaufdatum
4. Seite Letzte Reparatur/Upgrade
5. Seite Transfer User Data
EFR de/aktivieren *#3370#
Half Rate de/aktivieren *#4720#
Testmodus aktivieren *#746025625#
Provider lock status *#pw+1234567890+1
Network lock status #pw+1234567890+2
Provider lock status #pw+1234567890+3
SimCard lock status #pw+1234567890+4
Nokia 6110 Secret Codes
IMEI Nummer *#06#
Software Version *#0000#
1. Zeile Software Version
2. Zeile Datum der Software
3. Zeile Typ des Telefons
Servicemenü *#92702689#
1. Seite IMEI
2. Seite Herstellungsdatum
3. Seite Kaufdatum
4. Seite Letzte Reparatur/Upgrade
5. Seite Transfer User Data
EFR de/aktivieren *#3370#
Half Rate de/aktivieren *#4720#
Testmodus aktivieren *#746025625#
Nokia 6130 Secret Codes
IMEI Nummer *#06#
Software Version *#9999#
1. Zeile Software Version
2. Zeile Datum der Software
3. Zeile Typ des Telefons
Servicemenü *#92772689#
1. Seite IMEI
2. Seite Herstellungsdatum
3. Seite Kaufdatum
4. Seite Letzte Reparatur/Upgrade
5. Seite Transfer User Data
6. Seite insgesamte bisherige Telefonzeit (min)
EFR de/aktivieren *#3370#
Half Rate de/aktivieren *#4720#
Testmodus aktivieren *#746025625#
Nokia 6150 Secret Codes
IMEI Nummer *#06#
Servicemenü *#92702689#
1. Seite IMEI
2. Seite Herstellungsdatum
3. Seite Kaufdatum
4. Seite Letzte Reparatur/Upgrade
5. Seite Transfer User Data
EFR de/aktivieren *#3370#
Half Rate de/aktivieren *#4720#
Testmodus aktivieren *#746025625#
Nokia 7110 Secret Codes
IMEI Nummer *#06#
Servicemenü *#92702689#
1. Seite IMEI
2. Seite Herstellungsdatum
3. Seite Kaufdatum
4. Seite Letzte Reparatur/Upgrade
5. Seite Transfer User Data
Nokia 8110 Secret Codes
IMEI Nummer *#06#
Software Version *#8110#
1. Zeile Software Version
2. Zeile Datum der Software
3. Zeile Typ des Telefons
Servicemenü *#92702689#
1. Seite IMEI
2. Seite Herstellungsdatum
3. Seite Kaufdatum
4. Seite Letzte Reparatur/Upgrade
5. Seite Transfer User Data
Testmodus aktivieren *#746025625#
Nokia 8148 Secret Codes
IMEI Nummer *#06#
Tastensperre MENÜ + *
Lautlos MENÜ + #
Nokia 8810 Secret Codes
IMEI Nummer *#06#
Software Version *#0000#
1. Zeile Software Version
2. Zeile Datum der Software
3. Zeile Typ des Telefons
Seriennummer *#92702689#
1. Screen Herstellungsdatum
2. Screen IMEI
3. Screen Kaufdatum
4. Screen Letzte Reparatur
Nokia 9000 Secret Codes
IMEI Nummer *#06#
Software Version *#682371158412125#
1. Zeile Software Version
2. Zeile Datum der Software
3. Zeile Typ des Telefons
Firmware-Datum *#9999#
Nokia PT11 Secret Codes
IMEI Nummer *#06#
Software Version *#9999#
1. Zeile Software Version
2. Zeile Datum der Software
3. Zeile Typ des Telefons
Nokia PT11NF Secret Codes
IMEI Nummer *#06#
Software Version *#170602112302# bzw. *#682371158412125#
1. Zeile Software Version
2. Zeile Datum der Software
3. Zeile Typ des Telefons
Firmware-Datum *#3283#
Panasonic
GD55/G50/G51/G70/A100/A101/A102/X300: with or w/o SIM press *#369# and go to menu ¡°SW Version¡±
- GD67/GD87/X60/X66/X100/X200/X400/X500: with SIM press *#9999# while phone searching for network
- X200 : with SIM press #02# while phone searching for network
- X6X : Power on the phone with valid sim card and tape this code : 52824**
then tape 746, Menu, Menu then enter your code
Philips
PHILIPS DIGA *#06# IMEI
*#3333*# Blocking list
*#2558*# All time connected
*#3377*# IMEI,FLAGS,SIM LOCK
*#7489*# Security code ???
*#3353*# clear Blocking List
PHILIPS FIZZ *#06# IMEI
*#8377*# Software version
*#1234*# Security code
*#5644*# Service code
PHILIPS SPARK *#06# IMEI
*#2254*# Status register
*#2255*# Some kind of monitor mode during dialing.
*#2558*# Time connected to net.
*#2562*# ??? number of reconnections
*#2565*# Warm restart
*#3333*# BLOCKINGLIST
*#2377*# ???BERR Phone waits random time and reconnects to network.
*#3377*# Information, SIM-lock
*#7378*# SIM info
*#7489*# SECURITY CODE
*#7693*# Sleep mode
*#7948*# Turn off phone
*#8463*# Information on sleep mode
PHILIPS GENIE *#06# IMEI
*#2254*# STATUS REGISTER
*#2255*# Some kind of monitor mode during dialing.
*#2377*# ???BERR reconnect?
*#2355*# Near Cell Mode. U can see parameters of three nearest cells
*#2558*# Time connected
*#2562*# number of reconnections
*#2565*# Warm restart
*#2772*# Base Station Paging Multiframe.
*#2847*# HIDDEN MENU!: 5.5:Closed User Groups
*#3333*# BLOCKING - list
*#3353*# clears Blocking list
*#3377*# SIM LCK
*#4263*# Hs-OK:0 KO:0 , HNS-OK:0 KO:0
*#4377*# ??? battery charging ???
*#7378*# SIM phase
*#7489*# Security code
*#7693*# SLEEP-mode
*#7948*# Turn off
Samsung
E710/715
*#32436837# DAI ON Digital Audio Interference On
*#3243948# DAI OFF Digital Audio Interference Off
*#9324# MONITOR
*#0746# SSMS MEMORY:20
*#0842# vibra on
*#0289# buzzer on
*#4357# HELP (4357) This screen!!!!!!!
*#7777# verze SW
*#8888# verze HW
*#9999# Revize HW
*#0782# cas provozu, zapnitÃ* a vypnitÃ* - LIVE TIMER
*#0523# 41 (80) menu: 12
*#0638# SIM: f23003 F230 030
*#0778# SST size: 10
*#9273696# Java D/L setting
*#92782# Wap user agent
*#9998*5646# change operator logo at startup
*#9998*76# production number
*#9998*968# view melody for alarm - YAMAHA OK
*#0778# Sim Service table
*#9998*523# or *#9998*0523# or *#0523# Display Contrast
*#9998*288# or *#9998*0288# or *#0288# Battery & Field Infos
*#9998*5282# Java menu (GRPS/CSD settings for JAVA server)
E700/S500 100%..... X100/X600???!!!???
#*566335# Wap model ID
#*5663352# java model
#*5663351# model
#*53696# java download mode
#*536963# serial enabl others disabled
#*536962# HTTP enabl WAPSAR disabled
#*536961# WAPSAR enabl HTTP dis
*663867 MF file dumped
*335 All MMS mes deled
*2767*77667# Spain MMS settings
*2767*78667# Portugal
*2767*65667# Netherland
*2767*29667# Czech
*2767*28667# Austria
*2767*48667# Italy
*2767*37667# France
*2767*85667# Uk
*2767*33667# Germany
*2767*73738927# MMS Reset????
*2767*77927# Spain WAP Setting are applied
*2767*78927# Portugal
*2767*29927# Czech
*2767*65927# Netherlands
*2767*28927# Austria
*2767*37927# France
*2767*48927# Italy
*2767*85927# Uk
*2767*33927# Germany
#7263867# Ram Dump On
#*3232# Current Mode - DCD mode
#*3231# DCD en TRACE dis
#*3230# TRACE en DCD dis
#*7247# ??????
#*3683# ??????
#*3777# ??????
#*3779# ??????
#*8645# ??????
#*6428# MIC measuremnt CMD: Set, DSPMTCV11, MICHDW in cihard. opt
#*6422# MIC dep RXdata CMD: Set, DSPMTCV11, MICHDW in cihard. opt
#*6421# MIC on CMD: Set, DSPMTCV11, MICHDW in cihard. opt
#*6420# MIC off CMD: Set, DSPMTCV11, MICHDW in cihard. opt
*#7465625# Stav zámku
#7465625*28746# AktivnÃ* zámek deaktivován
*7465625*28746# Automatický zámek perzonalizován
#7465625*2827# Zámek Auto CP deaktivován
*7465625*2827# Zámek sÃ*te se musÃ* aktivovat
#7465625*2877# Zámek Auto SP deaktivován
*7465625*2877# Zámek sÃ*te se musÃ* aktivovat
#7465625*28782# Automatický zámek podskupiny deaktivován
*7465625*28782# Zámek sÃ*te se musÃ* aktivovat
#7465625*28638# Automatický zámek sÃ*te deaktivován
*7465625*28638# Automatický zámek sÃ*te perzonalizován
#7465625*228# AktivnÃ* zámek deaktivován
*7465625*228# AktivnÃ* zámek perzonalizován
#7465625*746* ???????
*7465625*746* ???????
#7465625*27* ???????
*7465625*27* ???????
#7465625*77* ???????
*7465625*77* ???????
#7465625*782* ???????
*7465625*782* ???????
#7465625*638* ???????
*7465625*638* ???????
*#8377466# SW + HW info
*#8888# HW info
*#9999# SW info
*#8999*8376263# komplet info
*#8999*636# IPD info
#*2677# ARM state: None
#*0000# ??????
*#8999*324# Net monitor??
#*6200#
#*6700#
#*6900#
#*7200# neplatná úroven prÃ*stupu
#*6100# command #*6100# Executed
*2767*3700# SGH-E700 BSI
*2767*7100# SGH-S100
*2767*8200# SGH-V200
*2767*7300# SGH-S300
#0111*codigo#
*2767*637#
*2767*688#
*2767*wap#
*2767*media#
*2767*mms#
*2767*226372# Camera Reset
*2767*688# MEP off
*2767*927# WAP
*2767*2878# E2P Custom reset
*2767*3855# E2P Full reset
*2767*2878# Sec reset
#*7828# C??? Midi Ri51
#*5111# PI 0813 33 99 MSI 7 NA 0 18 P99 T00 CffHff
#*2562# nejakej reset
#*2565# no blocking General Defense
#*3353# General defense Code Erased
#*3837# reset ???????
#*3849# reset ???????
#*3851# reset ???????
#*3876# reset ???????
#*7337# reset ???????
#*5376# reset All SMS Deleted
#*7222# Operation Typ: Class C GSM
#*7224# Error!!!!
#*7252# Operation Typ: Class B GSM
#*7271# multi Slot Class 1 GPRS
#*7274# multi Slot Class 4 GPRS
#*2787# CRTP on - Batery options
#*3737# L1 AFC DeltaF -36 NbAfcCorr 0 AdjustFoi 0 CumFoi 0
#*3825# Command #*3825# Executed
#*5133# L1 HO Data Async HO 83 Sync HO 0 HO Fail 0 TCH 40
#*7288# GPRS Detached
#*7287# GPRS Detached
#*7666# SrCell data RAC 255 NMO 255
#*7693# Sleep Deact
#*7284# Class B
#*2256# Calibr - info
#*2286# DATAbattery
#*2527# GPRS switching set to class 4
#*2679# Copycat feat. Activated
#*3940# External looptest 9600bps not avalible in SYSOL2!
#*4263# handsfree mode Activated
#*4700# Half rate deact
#*7352# BVMC Reg vaule Set BMVC to 00H For Cmd set DEBUGBATTERY in cihard.opt
#*8462# Sleeptime sinc SwitchOf
#*2558# Time ON For Cmd set DEBUGBATTERY in cihard.opt
#*3370# EFR Deact
#*3941# External looptest 115200bps not avalible in SYSOL2!
#*5176 L1 Sleep TOI N:5 TOI P:0
#*7462# SIM phase 3
#*7983# Voltage/Freg Deact
#*7986# Voltage Activated
#*8466# Old time
#*2255# Call failed mode: Command not Implemented
#*2285 nic
#*46539 nic
#*5143 nic
#*7629 nic
#*7646 nic
#*7665 nic
#*7633 nic
#*7626 nic
#*5174 nic
#*5175 nic
#*5177 nic
#*5156 nic
#*2282 nic
#*5132 nic
#*7276 nic
#*2355 nic
#*3333 nic
#*3377 nic
#*5187# L1C2G trace Activated
#*6837# Official SW version: 120107A1
#*7524# KCGPRS: +data
#*7562# LOCI GPRS: +data
#*7638# RLC allwazs open ended TBF Actiated
#*7632# Sleep mode Debug: +data
#*7673# Sleep mode RESET
#*2337# Permanent Registrtion Beep: NOT YET IMPLEMENTED
#*2474# For Cmd set DEBUGBATTERY in cihard.opt
#*2834# Audio Pth Mobile Normal
#*3270# DCS support Deact
#*3282# Data Deact
#*3476# EGSM Deact
#*3676# falh volume formated
#*4674# IMSI: +data
#*4760# GSM Activated
#*4864 pro tento model nic
#*5171 data
#*5172 data
#*5173 data
#*7326# Accessorz: vibrator
#*7676# Command #*7676# Executed
#*7683# Sleep variable
#*7762# SMS Bearer CS Activated
#*7957# Command #*7957# Executed
#*8465# Time in L1 +data
#*9278# Command #*9278# Executed
#*9795# WTLS key Reset
#*2252# Current call: +data
#*2836# AVDDSS Managment Deact.
#*3877# Dump of SPY trace: +data
#*7728# RSAV done
sharp reset EEP
1, push at once key 0+3+right option key up+red key (white screen)
2, in sequence push key 0,1,2,3, right option key up,1 (service menu)
3, write 99 and push right option key up
4, write 01 and push right option key up (now start RESET EEPROM)
Wait.....
5, push any key
6, push blue key menu (save)
7, power off
Sharp GX-10 unlock solution
With Sim Card (of locked network) in phone:
*01763*6371# and press M.
In menu go to: SETTINGS->SELECT->SECURITY
then in Security menu:MEP LOCKS->SELECT
insert default security code 0000
In menu go to NETWORK and choose DEACTIVATE
press SELECT and insert 812664697614
Press OK, phone anwser will be:
Sony-Ericssion
*#06# Imei Number.
>*<<*<* Software version.
*#0000# Default English.
<**< unlock Menu
CDMA CODES
<>
Samsung sph-n240, n400, a460, a500, etc Nam Programming :
Nam Set: ##Spc
Test Mode: 47*869#1235
Debug Menu: ##33284,ok
Service Menu: Menu+8+0 (#889)
Reset (Life time, Clear Memory, etc): ##786,ok
A-key: ##2539,ok
Label Selection: ##3882,ok
Label(Home, Work, etc) : **523,ok
NGG Setting (Gateway, etc.): ##2769737,ok
Vocoder: ##8626337,ok
CAI Change: ##7738,ok
Enable TTY: ##889,ok
Samsung sch-411, 611, n105, a100, a300, a2000, etc Nam Programming :
Nam Set: 47*869#08#9
Nam Set: Menu+60
Test Mode: *759#813580
Test Mode: 5809540*45680
A-key: Menu+0, 25##
External Audio: Menu+0, ####
Debug Menu: Menu+8, 0415 or Spc
Debug Menu: Menu+9, 0415 or Spc
Brief NAM Programing: Menu+40,626 (not all version)
LCD Contrast: Menu+45 (not all version)
SIO Mode: Menu+49
SIO Mode: Menu+69
Samsung a300, a530, a610, a620, a660, a670, etc Nam Programming :
Nam Set: Menu, 6, *
Nam Set: ##3238, ok
Nam Set: ##SPC (##000000), ok
Service Menu: Menu, 9, *
Test Mode: 47*68#13580
Test Mode: 47*869#1235
Samsung X, E, V, S-series (korean), e250, v420, s250, etc Nam Programming :
Nam Set: 6548#0**4#6
Nam Set: 47*869#08#9
Nam Set: 74153697193
Test Mode: 5809540*45680 (88 - efs clear)
Debug Menu: Menu(hold 2sec)+0, 6725 or 9720 or 1973 or 0415
Debug Menu: Menu+0(hold 2sec), 6725 or 9720 or 1973 or 0415
Samsung N356 (India version) Nam Programming :
Test Mode: Menu, 5, down arrow, *
Test Mode: **00## (in some flashes)
Samsung i700, etc Nam Programming :
Nam Set: Go to start and select "PHONE" from the drop down menu, dial #83587
Samsung i300, etc Nam Programming :
1. Tap on the Phone Icon with stylus
2. Press #907*9#0 ENTER LOCK should appear on screen
3. Enter OTKSL
4. SVC MENU will appear press 1
5. Enter 10 digit MIN and then press SAVE
6. Press SAVE again
7. Press 3 and then press SAVE 6 times
8. Enter the HOME SID and press SAVE once
9. Press END key twice
<>
Qualcomm qcp-800 Nam Pogramming :
Nam Set: Menu+3+0+Spc
Field Test: Menu+7+0+Fsc
Kyocera 1135, 2255, 3035, 5135, 6035, Se47, etc Nam Programming :
Nam Set: 111111+Jog Dial(Ok), Select "Programming"+Spc
CAI Change: ##7738,ok
Enable TTY: ##889,ok
Life Timer, PRL, etc: ##786,ok
A-key: ##2539,ok
A-key: 2539,ok
Tips:
On some kyocera handsets the factory service module has not been disabled
and the phone can be programmed without the spc by inputting.
Nam Set: ##333333 menu (service)
<>
Sanyo 4900, 5150, 5300, 8100, etc Nam Programming :
Nam Set: ##Spc+Ok+Key Down+Ok
Advanced Setup: ##3282+Ok+Key Down+Ok+Msl
A-key: ##2539+Ok+Key Down+Ok
Version: ##**837+Ok+Key Down+Ok
Debug Menu: ##FSC+Ok+Key Down+Ok
Airtime menu: ##8463+Ok+Key Down+Ok
Change CAI: ##7738+Ok+Key Down+Ok
Vocoder: ##8626337+Ok+Key Down+Ok
Reverse Logistic: ##786+Ok+Key Down+Ok
Set IP Address: ##2769737+Ok+Key Down+Ok
TTY On/Off: ##889+Ok+Key Down+Ok
Ready Link: ##4636+Ok+Key Down+Ok
Browser Init On/Off: ##4682+Ok+Key Down+Ok
Picture Token: ##25327+Ok+Key Down+Ok
Unknown Code: ##5282277+Ok+Key Down+Ok
(SPC=000000, FSC=040793)
Sanyo scp-A011, smp-A017, etc Nam Programming :
Nam Set: F9(3 beep) + 0*72696#767
<>
Nokia 3280, 3285, 3580, 3585, 5185, 6185, 8280, etc Nam Programming :
Nam Set: *3001#12345#
Software Version: *#837#
Software Version: *#9999#
Esn Number: *#92772689#
Restart Phone: *#75681#
Restart Phone: *#75682#
Nokia 8887 Nam Programming :
Nam Set: *3001#12345#
Version: *#0000#
Evrc: *#8378#
Esn/Data/Timer: *#92772689#
SID: *#743#
Nokia 8587 Nam Programming :
Nam Set: *#626#7764726#
A-Key: #8159357022#4579# (26 digits)
A-Key: #8159357022#4547# (20 digits)
Version: *#0000#
Version: *#837#
Vocoder: *#3872#
Change language: Menu 5, 3, 1
Change DM mode: *#7678#
Debug Screen: *#8378#
Debug: *#8380#
Field Test Menu: *#83788#
SPC Unlock, Factory Reset :
Full Factory Reset: *#7370#
Resets all settings including non-user changeable items (like SPC)
NOKIA TEST MODE:
51xx, 61xx, 71xx, 3285, 63xx, etc :
1) Turn on the phone. Press *3001#12345#
2) Scroll up to where it says "Field Test" and choose SELECT
3) Highlight "Enable" and choose OK. Turn the phone off then back on.
4) If the test mode screen does not show up press MENU and scroll
down to "Field Test" choose SELECT. Press 0 1 then choose OK.
5) Lower left or upper left number is the signal strength.
6) To turn off the test mode press MENU and scroll down to where it says
"Field Test" choose SELECT. Press 0 0 and then choose OK.
3360, 6360 :
1) Turn on the phone. Press *3001#12345#
2) Scroll up to where it says "Field Test" and choose SELECT
3) Highlight "Enable" and choose OK. Turn the phone off then back on.
4) If the test mode screen does not show up press MENU and scroll
down to "Field Test" choose SELECT. Press 2 1 0 1 then choose OK.
5) Lower left or upper left number is the signal strength.
6) To turn off the test mode press MENU and scroll down to where it says
"Field Test" choose SELECT. Press 2 1 0 0 and then choose OK.
<>
Audiovox 4000, 9000, 9100, 9155, 9500, etc Nam Programming :
(Power the phone on and wait until the little light on top goes out)
Nam Set: 289+fcn+#+1
Service menu: fcn+00+fsc(000000)
Test Mode: Hold (2,*,Rcl)+Power
Test Mode Commands:
99 - download - flash phone
124 - inam data write
125 - version
126 - esn read
127 - sec_code
128 - lock_code
129 - is WFTV data write
137 - FSC code
138 - NPcode (nam program code)
139 - dscode
141 - restart
218 - Read_Addr
000 - is cdma mode
001 - is fm mode
002 - is pcs mode
008 - is reg read addr
020 - is lna_range
Audiovox pcx-3500xl Nam Programming :
Nam Set: ##2726+Send+1998+1+Spc+1
Audiovox cdm-100, 130, 135, 8300, 8500, 8600, etc Nam Programming :
Nam Set: ##20022002+Pwr+1+Spc
Audiovox 8610, 8910, etc Nam programming :
Name Set: ##847446, end, 111111
Audiovox-107 Nam Programming :
Nam Set: 45680*47*869#1
Audiovox CMP-3 Nam Programming :
Nam Set: 45680*47*869#1
Dm Mode: Menu, 6, 6
Audiovox 9950 Nam Programming :
Nam Set: ##3282
Audiovox Z800 (Audiovox 7900, Sharp) Nam Programming :
Nam Set: m + # + envelope key + * + 1
Audiovox Thera (Toshiba 2032) Nam Programming :
Thera Nam Programming User Manual - nam_thera.pdf
AUDIOVOX TEST MODE :
9100, 9155:
1) Turn on the phone. As soon the phone comes on and the green light
turns off press RIGHTARROW, 0, 0. The phone will ask for the
"FSC Code", press 000000 then choose OK and press RIGHTARROW,
RIGHTARROW. Your phone is now in test mode.
2) The signal strength is the number on the top right hand side of the screen.
3) To turn off test mode shut of the phone and then turn it back on.
<>
Motorola 7760, 7860, 2260, 8160, etc Nam Programming :
Nam Set: Fcn,0000000000000, Rcl
Nam Set: 7466 3 #, Fcn, Fcn
Test Mode: Fcn, 00**83786633, Sto
Motorola v60c, v120c etc Nam Programming :
Nam Set: 74663#, Menu, Menu, Spc
Nam Set: Menu, 073887, * (type quickly)
Test Mode: Menu, 073887*, Spc
Debug Mode: ##33284
Force the phone into DIGITAL ONLY mode:
1) ##33284 (Debug)
2) RIGHT Softkey (Next) Twice
3) Down arrow 10 times to "PrefMod"
4) RIGHT Softkey (Change) until you see "DigOnly"
5) LEFT softkey (Exit)
6) MENU then LEFT Softkey return to idle screen
7) ##33284 (The last 4 will not display if you have done it correctly)
Motorola t182, c210, etc Nam Programming :
Nam Set: ##1111 end
Nam Set: ##298645665 end
Short Nam: ##073887 sto
Motorola v710, v730, v740, ms150, etc Nam Programming :
Nam Set: 8378*# + press 3 times NATE (spc - 071082)
Test Mode: Menu, 073887*, Spc
Service Menu: #758353266#646#
Motorola StarTac 2004 Nam Programming :
Nam Set: 5759789*#, rec key (3)times (spc - 915037)
Motorola ms200, ms230, etc Nam Programming :
Nam Set: 5759789*# (spc - 915037)
Motorola v6060 Nam Programming :
Nam Set:147*369#456*0#
Motorola Razr V3C Nam Programming:
Nam Set: 74663 # clr clr
Nam Set: #073887* , then SPC
Subscribe to:
Posts (Atom)